When it comes to E-Commerce platforms, WooCommerce is preferred for good reason – it’s easy enough to set up a WooCommerce store. Just buy a domain and add the WooCommerce plugin to your WordPress website.
Tools like personalization, real-time inventory, live chat go a long way in giving users what they want and keep them coming back. However, there is no feature or tool that can make up for one basic flaw: a slow website.
Here’s a scary statistic: 40% of shoppers won’t wait more than 3 seconds for a retail site to load. Thankfully, there are a few things WooCommerce developers, QAs, and merchants can do to take their website from slow to fast. In this article we will look at some of these steps.
How to speed up WooCommerce?
1. Increase the WordPress memory limit
By default, the WordPress memory is set to 32MB. At some point, this limit will be exceeded and the user will get an error message notifying him. Now, there are two ways to solve this problem: the user does it himself or contact the hosting company.
To configure WordPress memory themselves, users can use the following steps:
Edit the wp-config.php file
Open wp-config.php, which is by default in the WordPress root directory
Locate the following line near the end of the file: / * That’s it, stop editing! Good blog. * /
Just above that line, add: define (‘WP_MEMORY_LIMIT’, ‘256M’)
Save the changes
Edit the PHP.ini file
If the user has access to their PHP.ini file, change the line to PHP.ini
If the line shows 64M try 256M: memory_limit = 256M
The maximum amount of memory a script can consume is 64 MB.
Edit the .htaccess file
If the user does not have access to PHP.ini they can try adding the following line to an .htaccess file: php_value memory_limit 256M
2. Optimize the WooCommerce website images
Being visual creatures, people are drawn to visually appealing websites. Pictures are an important part of this look. However, using non-optimized images can adversely affect website performance by slowing it down. Image optimization is a simple and effective way to speed up WooCommerce sites.
Large image files create loading delays on the website UX. Slow WooCommerce sites can lead to website downranking in search engines in SERPs.
You can avoid this situation by using image compression plugins like WP-Smush.it, EWWW Image Optimizer or Hammy. These in fact reduce the size of the images and optimize them in WordPress, without negatively affecting the image quality.
3. Use a high quality hosting service
A hosting service allows website owners to use a host server to store website content – media files and other relevant files. The hosting service is the foundation of the website as it handles all traffic and data. Therefore, a low-quality hosting service will hurt the performance of the WooCommerce website, especially the traffic, products or offers, as the number of web pages increases. Always choose a fast and robust hosting service with the following qualities:
24/7 technical support to resolve issues and answer questions
High-end cloud infrastructure
Flexible in its ability to adapt as a WooCommerce store grows
Data centers around the world
High uptime rate so that the website is never down
Provides SSD-based solution
A server located geographically close to the website audience, thus providing fast response times
4. Disable AJAX cart snippets in WooCommerce
AJAX Cart Fragments is a WooCommerce feature. It is a script that uses Admin-Ajax to automatically update the customer’s cart total without having to refresh the page. This is especially effective when it comes to generating instant feedback for shoppers so they know the right items have been added to their carts.
Despite its effectiveness, this feature can slow down the speed of the site. It might even stop caching on pages that don’t actually need cart details. If you are experiencing a large number of AJAX requests on a WooCommerce site, disabling AJAX Cart Fragments will help increase the speed and stability of the website.
Solve this problem with the following: wc-ajax = get_refreshed_fragments. You can also use the Disable Cart Fragments plugin which automatically disables the AJAX Cart Fragments feature in WooCommerce. However, as you do this, remember to redirect customers to the shopping cart page when they need to verify the information. Otherwise, deactivation will interrupt the user experience.
5. Use a cache plugin
With caching, a version of the WooCommerce store asset is stored on the visitor’s device, thus allowing the site to load faster. This occurs because caching reduces the amount of data sent between the visitor’s browsers, the site database, and the server.
Pay attention to the following:
Server Cache: Because the server generates the web page, server caching allows it to remember parts of the web page so that the whole page doesn’t have to be generated from scratch every time.
Browser caching – Helps the browser remember what a web page looks like so it doesn’t have to waste time exchanging data with the server. This is useful for visitors accessing multiple pages because static files (style sheets, JavaScript files) can be stored by the browser.
Reading Time: 4minutes
This guide gives you full control over the process. This has been applied by PrestaShop for several major versions and thus can be applied on very old stores.
Once you have the folders like classes /, modules /, themes / , etc. you can go to the next step.
Simple Data Cleanup
Avoid overwriting production resources (images, conf…) with default data. These folders can be removed from the new version:
img /
override /
All other files in the new version will overwrite the existing files. Any changes made to the original source code will be lost.
Also, rename the “admin” folder to match your store’s admin folder name. This will prevent unwanted duplication of the administration content.
Activation of maintenance mode
As it may cause unexpected behavior for you and your customers during the upgrade, we strongly recommend that you turn on maintenance mode during the upgrade.
You can do this in your admin panel:
On PrestaShop 1.7, in Store parameters> General> Maintenance tab
On PrestaShop 1.6, in Shop parameters> Maintenance
Adding your IP address will allow you to access your store while it is in maintenance mode. This way, you can make sure everything is working properly before allowing your customers to access it again.
Copy the files
In this step, we “update” the PrestaShop files by copying the content of the new version to the existing store.
Disable the cache
You may have activated a caching system (e.g. memcache) on your store. If so, be sure to disable it in “ Advanced Settings”> “Performance” . You can enable it again once the update process is finished.
Note on the “Vendor” folder: the previous updates of PrestaShop 1.7 showed that conflicts can occur when merging the new supplier / folder with the old one. To avoid this problem, it is recommended to delete this folder in the existing store before copying the new one.
On Windows, copy the new contents of the folder and paste it into your store folder. You will receive warnings that the files already exist in the destination folder. Choose “overwrite” to continue.
You can double check that each action is marked “OK”. If not, further details will be shown after the request, which can help you resolve the issue and re-run the request manually on your database. In some cases, you may need to restore the database backup and start over.
Error codes
You can also see an error code. Each code is related to a message described here:
Error n. 27: The store is running a newer version than the content provided by the installation folder.
Error n. 28: The store is already at the version you are trying to upgrade to.
Error # 29: The current version could not be found. Check the database parameter file and database connection.
Error n. 31: unable to find upgrade directory in installation path, install / upgrade / sql folder exists and is not empty?
Error # 32: No updates need to be applied.
Error # 33: Error loading an SQL update file. Check the permissions of the install / upgrade / sql folder.
Error # 40: The version provided in the install / install_version.php file is not valid.
Error # 43: Error updating database schema using doctrine.
Error # 44: Error updating translations.
Error # 45: error while enabling the theme.
Cleaning
Before we go any further, we will have to do some cleaning.
The installation folder, used to perform database updates, is no longer needed and can be safely deleted.
When you open your store (in the front or back office) on your browser, you may experience some visual problems. This may be because your old resources are still served by a cache. Reload them by forcibly refreshing the page (press ctrl + R on Windows / Linux or cmd + R on Mac OS) or by clearing your browser cache.
Update the modules
Your module files were updated while the file was copied, however many of them may require additional database changes. Check the module page in your Back Office to see if updates are pending.
Go to your admin panel and log in. You will notice that the version displayed has changed on the login page. Then in the menu, click on the form page to reach your catalog.
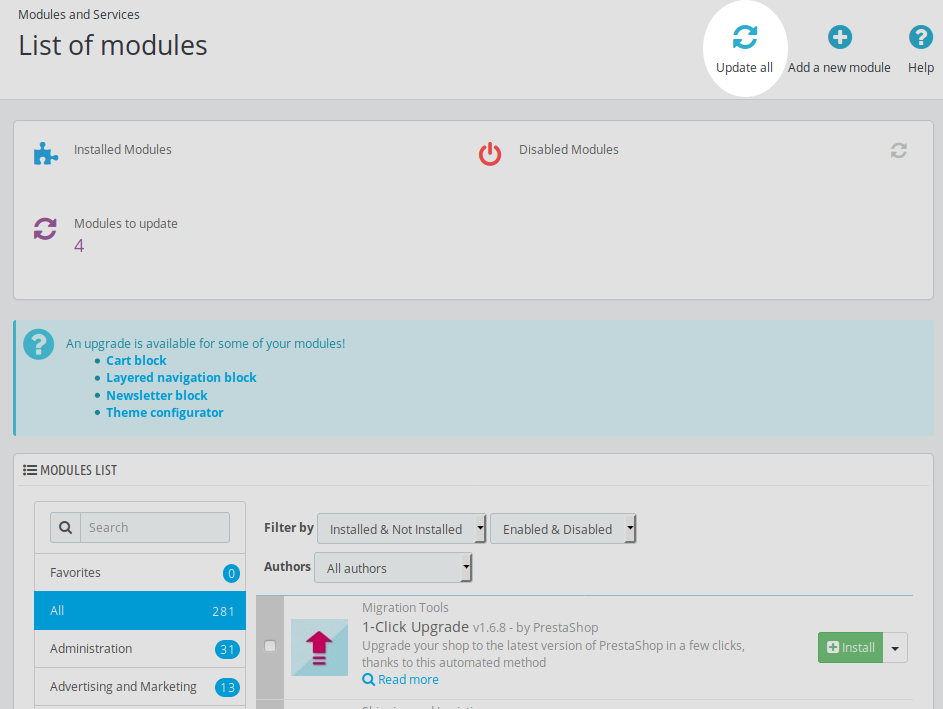
On PrestaShop 1.6, this page is located in “Module and services”. Click “Update All” at the top of the page to perform all available updates:
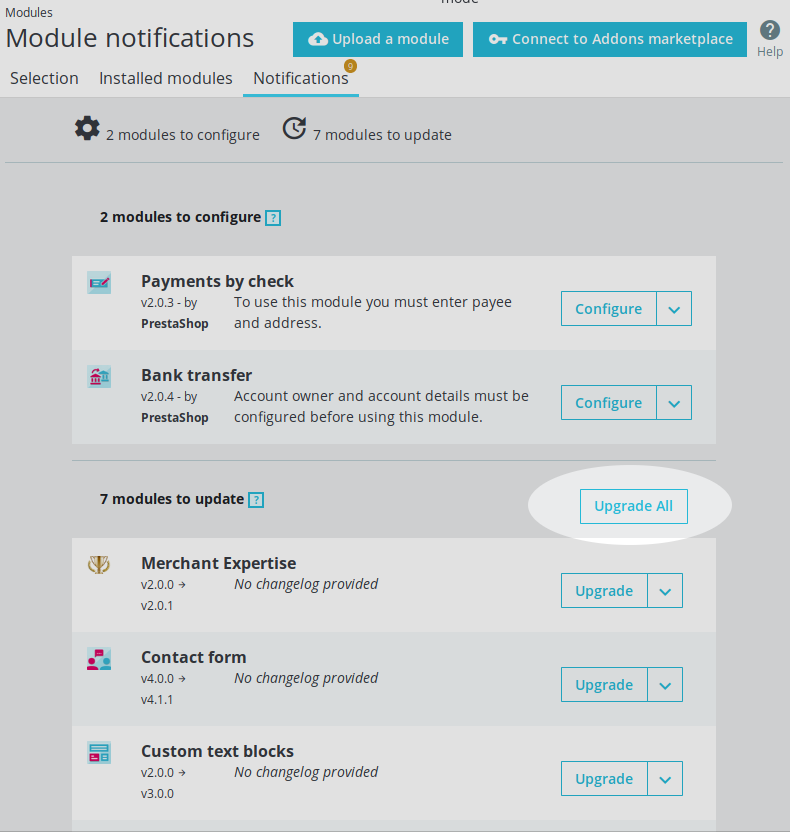
On PrestaShop 1.7, the same functionality can be found on the Enhance >> Modules page, in the “Notifications” tab:
1-click update module
If the manual process seems too tedious, there are other solutions to complete an update.
PrestaShop provides free 1-click upgrade module on the marketplace and admin panel of your store. It automatically carries out the previously mentioned process and is available for almost all versions of PrestaShop.
CDNs – Content Delivery Networks are the transparent backbone of the Internet and are responsible for content distribution. Each of us interacts with CDNs on a daily basis; when reading articles on news sites, shopping online, watching YouTube videos, or browsing social media feeds.
To understand why CDNs are so widely used, you must first understand what problem they solve. Latency is the annoying delay that occurs from the moment you request to load a web page to the moment its content actually appears on the screen. The CDN serves to overcome this problem.
In essence, CDNs allow you to speed up the process of transferring resources to load Internet content. By now CDN services have become a fundamental element that, to date, is used by the majority of web traffic, including traffic from major sites such as Facebook, Netflix and Amazon.
What is the CDN?
The delay interval is affected by a number of factors, many of which are specific to a particular web page. In all cases, however, the length of the delay is affected by the physical distance between you and that website’s hosting server.
La missione della CDN è ridurre virtualmente quella distanza fisica, con l’obiettivo di migliorare la velocità e le prestazioni di rendering del sito.
The CDN’s mission is to virtually reduce that physical distance, with the goal of improving site rendering speed and performance.
How to configure CDN in Magento 2
Configuring Magento 2 CDN – Content Delivery Network (CDN) is one of the advanced solutions to consider, when the performance of your site is too low. Web loading time is an important factor that affects your user experience, as is SEO. Unlike the full page cache, the Content Delivery Network (CDN) is not fully integrated into Magento 2, so you have to choose and configure a CDN on your own.
Therefore, in this post, we will see how to install a CDN on Magento to help you achieve incredible speed on the site.
Configure a CDN in Magento 2
In the Admin Panel, click on Shops .
In the Settings section , select Configuration .
Select Web under General in the left panel
Open the Basic URL section and continue with the following:
In the Base URL for static View Files field enter the URL of the location on the CDN where the static view files are stored
In the Base URL User Media Files field , enter the URL of the JavaScript files on the CDN
Open the Base URL (secure) section and continues with the following:
In the Secure Base URL for Static View Files field , enter the URL of the location on the CDN where the static view files are stored.
In the Secure Base URL for Medium User field , enter the URL of the JavaScript files on the CDN.
Switching from shared hosting to a virtual private server (VPS) is a relatively easy move. However, learning how to set up a VPS can be a little more complicated, especially if you’ve never used a command line before.
In this article, we will then see how to set up a VPS in five steps:
Find out how to log into your VPS via Secure Shell (SSH) login.
Updating your server.
Creating a new user and changing his privileges.
Enabling public key authentication.
Configure a firewall for your VPS.
Before we get into the technical details, however, we will explain why you will need to set up your new virtual server. Let’s talk about how to set up a VPS!
Why you should set up your new VPS
Usually, when you sign up for a basic hosting plan, your provider will set up all the software you’ll need to use it. With shared hosting, for example, you’ll likely have access to a control panel for your account right away.
These hosting control panels provide you with all the options you need to set up your account. However, in most cases, you will not be able to change the actual settings of your server, because other people are also using the same machine.
With a VPS, on the other hand, you get a server environment all to yourself . In most cases, your host will go so far as to configure basic server software, such as Apache or Nginx, and the rest is up to you. This means that you will likely need to take a few additional steps to prepare your server, for example:
Decide when to start using VPS.
Learn to connect to it and issue commands.
Understand how to install new software and perform updates.
Set up new user accounts (if needed).
Setting up a firewall.
Usually, you will interact with your VPS using a command line instead of a graphical user interface (GUI). It can be intimidating at first, but you’ll quickly get used to it if you don’t mind Googleing for the right commands and following a few simple tutorials.
You can also set up hosting control panels that will allow you to interact with your server using a GUI.
5 steps to set up your new VPS
As you may know, the vast majority of web servers run on Unix-based systems. This means that you will need to use commands tailored to thatSet featured image type of operating system (OS), which are not the same as you would use on a Windows machine.
That said, let’s talk about how to set up a VPS!
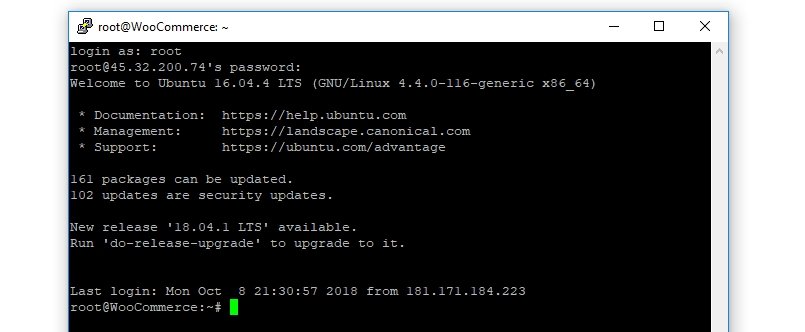
Step 1: log into the VPS via Secure Shell (SSH) login
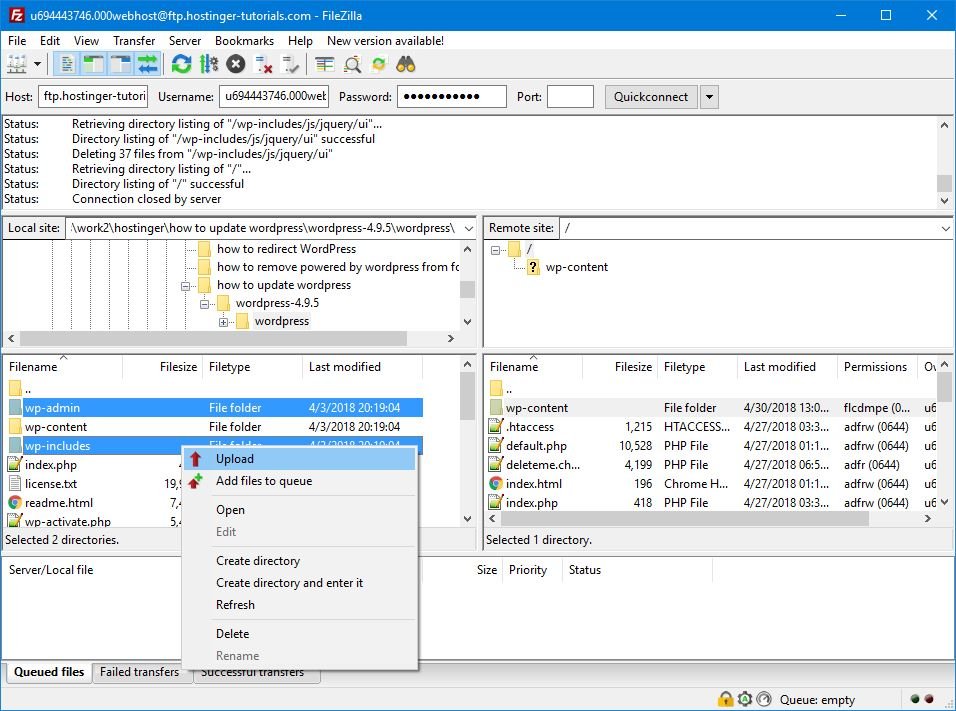
There are several ways to connect to a website besides using a browser. For example, you can use File Transfer Protocol (FTP), which allows you to upload, download and edit files on your server:
While FTP can be very useful, the protocol does not allow you to send commands to your server. For this, you will need to use Secure Shell (SSH) access, which is a different type of protocol that provides you with access to remote servers.
Once you connect to a server via SSH, you will be able to send commands to it. SSH is also known for its strong encryption and authentication protocols, which make it highly secure. By learning how to use SSH, you will take your first steps in server management.
Once you’ve signed up for a VPS plan, your web host should provide you with a number of credentials, including:
The IP address of your server
A username (usually root)
A password for your root account
In case you are unfamiliar with the term, a root (or superuser) account is a user with full privileges and access on a specific system. You can think of it as the equivalent of an administrator, but with even more power.
When setting up a VPS, you will start with a single root account, which is what you will use to make the initial connection. If you are using a Unix-based operating system, you can connect to your server directly from the command line.
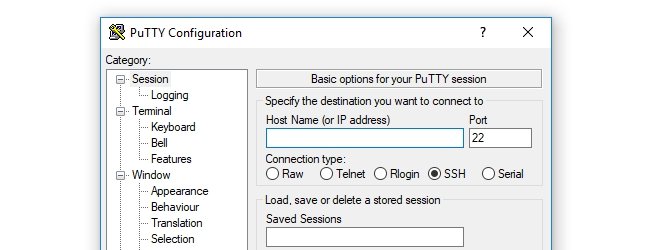
For this tutorial, we will be using PuTTY in our examples.
You will then see a window like this:
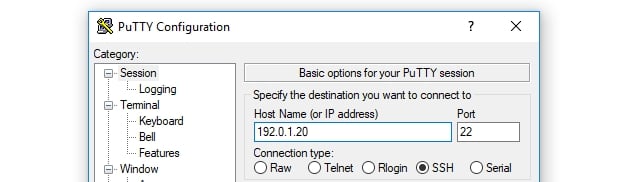
At this point, you need to enter your server’s IP address in the Hostname (or IP address) field and leave the Port setting at the default value of 22:
You may notice that there is an option to select the type of connection you want to use under the IP field. Choose SSH, then you can go ahead and hit the Open button .
A command line window will open to you now and you will see a prompt to enter your login information. In this case, it will be root and its corresponding password:
If the data entered is correct, you will see a brief summary of your server details and a request to enter more commands:
Don’t close the command line window yet, as we still have some work to do.
Step 2: update your server
Once logged into your VPS, you will see a message telling you if there are any “packages” or security updates available:
Packages are essentially Unix language software. When it comes to any system, it is always important to keep its components up to date and servers are no exception.
If you’re using outdated software, you open your server (and website) to security vulnerabilities. Additionally, you may miss out on new features or improved performance. That’s why the first thing you’ll want to do is update your server’s packages and download any pending security patches.
To get started, type the apt update command and hit Enter . Now your server will double check which packages need to be updated. Once done, enter apt upgrade , which will upgrade your server’s packages.
This process may take some time, depending on the number of updates required for the server installation.
Once all your packages are up to date, you should go ahead and reboot your server using the reboot command. Then, close the command line window. Wait a minute or two and log in again.
If all went according to plan, no other available updates should be listed. This means that we can move on to the next stage of learning the configuration of a VPS.
Step 3: Create a new user and change their privileges
When setting up a VPS, you start with a root user, which is the account you have used so far. However, it’s usually a good idea to set up another user account with superuser privileges.
The reason for this is that the root account can cause severe damage if you are not sure what you are doing. A root account has full access to all settings on your system, so one wrong command can create serious problems.
A normal user account with superuser privileges, on the other hand, must add the prefix sudo to any command it wishes to execute using administrator privileges. This may seem like a small change, but it makes a huge difference. With this approach, you’ll have to think twice before running any commands using the sudo prefix, which can help you avoid crashes.
Go ahead and set up that new user right away by entering the following command. We recommend replacing the second part with the username you want to use:
adduser yournewusername
Then, type this line to add that user to the sudo group, which will give them superuser privileges (again, replacing the placeholder with your new username):
# usermod -aG sudo yournewusername
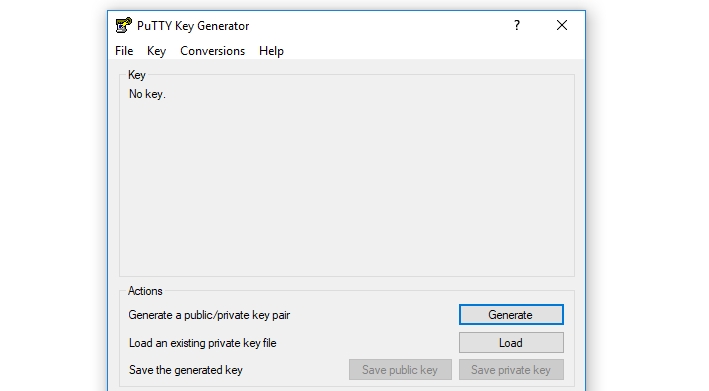
Step 4: Enable Public Key Authentication
Public key authentication is probably a more secure technique than regular passwords. With this approach, you generate a set of both “public” and “private” keys.
Your server will store your public key and use it to authenticate your private key, which only you will have access to as a file on your computer. After setting up public key authentication, you will need both the private key and a passphrase to log in, which significantly increases security.
To generate SSH keys in Windows, you can use the PuTTYgen app, which will have been installed when you configured the client earlier. Search your programs and now run the PuTTYgen app, which should look like this:
It’s okay to use the default settings for the key pair, so go ahead and click the Generate Now button . To make your key more unique, the program will ask you to move the mouse to randomize it.
Next, the program will show you the public key it generated for you. Before you do anything else, go ahead and set up an accompanying passphrase, which will act as the password along with the key.
Now go ahead and hit the Save Private Key button and save the resulting file to your computer. You’ll also need to copy your public key in a moment, so don’t close this window yet.
Then, log back into your server using the original root user and change to your new account’s home directory using # su – yournewusername . The command line will now reflect your new user:
Next, you’ll need to run a series of commands in order, which will create a new folder for your public key, restrict that folder’s permissions, and save your key:
This last command will open the Nano editor, allowing you to edit the new authorized_keys file on your server. Go ahead and copy your public key now from the PuTTYgen window and paste it here.
Once the key is ready, press CTRL + X to close the editor and enter Y when it asks you to confirm the changes to the file. Then, type the following two commands:
chmod 600 ~ / .ssh / authorized_keys

exit
These will change the permissions for the file you just edited and then return to the root user.
Next, you will need to configure PuTTY to use your private key when you connect to your server so that it can recognize you. To do this, go back to the main screen of the app and go to the Connection ›SSH› Auth section. Inside you will find a field called Private key file for authentication.
Click the Browse button, then locate the private key file stored on your computer. Select it and you are good to go.
Finally, you need to tell your server to disable the default password-only authentication method for the new user you just set up. To do this, log into your server as a new user via SSH and run this command:
sudo nano / etc / ssh / sshd_config
This will open the s shd_config file using the Nano editor. Look for the line that reads PasswordAuthentication within that file and delete the # sign before it. Then change its value from Yes to No, so it reads like this:
PasswordAuthentication no
Save the changes to the file and restart the server. The next time you try to log in, you will only be able to log in using your private key and passphrase.
Step 5: Set up a firewall for your VPS
So far we have talked a lot about how to set up a VPS. However, there is still one last step to take if you want to keep your server secure. That is, enable a firewall for this.
Conclusion
By setting up a VPS you will have much more space and functionality, but you will have to find your balance before you can start enjoying yourself. Now that you know how to set up your VPS, you are familiar with the command line, which will make it much easier to set everything up to your liking.
Source: hostinger.com
Reading Time: 2minutes
Are you thinking of updating WordPres s but don’t know how to do it? In fact, often the fear of those who want to update WordPress is to damage their website.
This fear is understandable, however it is important to always update to the latest version of WordPress to ensure better security and performance of your website.
Why do you need to update WordPress?
Major WordPress security research shows that most WordPress websites that get compromised are due to an outdated WordPress core, plugin, or theme.
WordPress is actively managed by developers from around the world. These developers find and fix bugs, add new features, and hunt down security vulnerabilities on a regular basis. These changes are then released in a new version of WordPress.
You must then update your site, to make sure that the latest security patches and the latest features are installed. You will also have an improvement in speed and performance.
That said, let’s see how to safely update WordPress to the latest version.
What to do before updating WordPress?
The most important thing you need to do before updating WordPress is to create a full backup .
You still need to make sure you create a new backup and store it securely in a remote location.
A full WordPress backup includes everything.
Your WordPress database
All your images and media uploads
Your WordPress plugins and themes
WordPress core files
This step is crucial as it will allow you to restore WordPress from backup in case something goes wrong.
After creating a full backup, you can move on to the next step.
Update of WordPress to the latest version
There are two simple ways to update your WordPress site to the latest version.
WordPress update using the built-in system
This method is the simplest and is therefore the most recommended for all users.
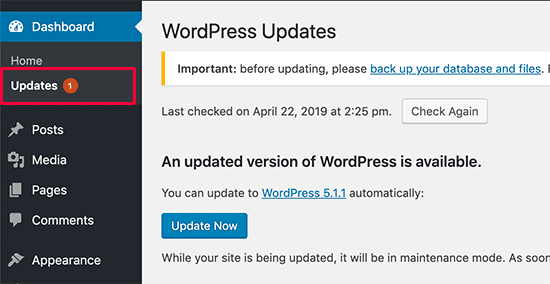
First, log into the admin area of your WordPress website and go to the Dashboard » Updates page .
You will see the warning that a new version of WordPress is available. Now you just need to click on the “ Update Now ” button to start the update.
WordPress will now fetch the latest version of the software and install it for you.
You will see the update progress on the screen. During the update, WordPress will put your site into maintenance mode.
Your site will still be visible to users, but you won’t be able to install plugins or themes while the update is in progress.
Once the update is complete, you will be redirected to the WordPress welcome screen. Depending on each version you may see a page explaining what’s new in WordPress and the features you should try.
That’s it, you have successfully updated WordPress to the latest version!
What to do after the update?
Once you’ve updated WordPress on your website, the only thing you need to do is make sure everything is working as expected. Simply visit your website in a new browser window and check the Settings in the WordPress admin area.
Reading Time: 3minutes
We hear a lot about Headless Commerce lately, but what exactly does it mean and why is it so important for E-Commerce?
This new technological system opens up new perspectives for online sales and digital marketing. It is basically a new frontier, which can concretely help E-Commerce to sell better and more. Yes, but what is it in essence?
To understand better, let’s first make an overview and distinction between traditional E-Commerce and Headless Commerce.
Ecommerce Tradition Vs Headless Commerce
Traditional E-Commerce
In traditional platforms, we know that there is a backend part, where we manage products, orders, shipments, and a frontend part, which is the real site that customers see. Backend and Frontend are essentially two sides of the same coin in traditional stores. The site is managed in the backend, while the frontend is essentially the E-Commerce site that we see online.
The customer must necessarily complete the purchase on the E-Commerce site. So all the marketing activities that are carried out are aimed at bringing the user to the E-Commerce site, because only them will be able to make the purchase. This system, in our times, could be a little too laborious. This is because perhaps the customer, may have seen the product that interests him on a post on social media and go through a certain path and then have to conclude the purchase on the site, could somehow discourage him.
Headless Commerce
With Headless commerce, on the other hand, there is a concrete distinction between product management backend and frontend. But above all, with this new technology you will be able to manage content related to products to sell separately, with respect to the channels in which they are offered to the customer. That is, you can create product sheets and then present this card both on the site, in an email, or on a blog or a social post. The system will automatically format it according to the channel on which this card will travel.
In this way, the customer will have the fabulous opportunity to be able to buy directly in the channel in which the news of the product reached him, without necessarily having to be sent back to the site. Obviously in this we reduce a lot the steps to make a purchase and we know that this factor becomes fundamental for the finalization of a purchase.
Basically, when you create a product or put it on promotion, we can immediately decide the channels on which we want this product to appear.
Some platforms, such as Sylius for example, are based on the concept of headless and are therefore able to decouple frontend and backend and take advantage of CRM platforms for content management.
In short, this is really an excellent system to make the user experience really fluid and to accompany the customer to the purchase. With this tool we can in fact customize the contents to the maximum, to create a solid relationship with the customer, throughout the purchase process.
Headless and personalized marketing
An aspect not to be underestimated related to headless, is also that of being able to collect valuable information on the behavior and interests of the customer. In this way it will be much easier to structure a targeted strategy for each user. How does?
A customer purchases a product, the system thus acquires this information and the next time the user returns to our site, he will be shown articles related to the purchased product. Products that the system can send a few days later also via email or other channels.
So as you can see, truly an incredible tool!
Disadvantages and advantages of headless commerce
We are starting to see the negative and positive aspects of this new way of doing online sales.
Disadvantages
We have seen how many features are connected to headless, but this obviously leads to an infrastructure complexity. In fact, if a traditional E-Commerce consists of software + various plugins, the headless system is much more complex. In fact, there are different software that must work with each other, that interface and exchange data.
The management of this type of system can therefore be more complex.
Benefits
As advantages, we have already seen some of them, such as the ease of the purchase process and the collection of data to better target offers to the customer. So basically with headless commerce, there is an orientation closer to the customer and his needs.
Summarizing therefore, as advantages we find:
Ease of purchase with products that can be purchased anywhere
Collection of data for the finalization of ad hoc offers
Ready for marketing automation
Formatting for each publishing point
Reading Time: 4minutes
Keeping a site updated, especially Woocommerce, which is linked to an E-Commerce platform, becomes a fundamental step to keep it safe. However, when there are updates, site owners don’t have a uniform behavior.
In fact, there are those who do it seriously and those who take it a little lightly. However, the update is something very complex, which requires a series of procedures to be applied, in order to live it serenely. So let’s see how to carry out a Woocommerce update in a simple way.
Woocommerce update: preliminary operations
The first thing to do when you decide to do an update is definitely to make a backup. This is because we don’t know how our site might respond to newly installed updates. So in order not to know how to read or write, it is good to make a backup.
It would also be advisable to test the new releases.
In this way we avoid having bad surprises!
Basically, you need to take some time, before clicking on “update”, to understand what kind of update you are talking about and what changes will be implemented. But above all, what impact will they have? To answer these questions, just see the description that explains which features will be applied.
To overcome this problem, you can also consult some Woocommerce support forums, because if there is a problem related to an update, surely it emerges from the forum.
Backup
Any WordPress and WooCommerce based store has two places where data and content are stored. One is your wp-content folder , where your themes, plugins and uploaded content are located. Another is the database that organizes and stores your product, order, post, page, etc…. data.
With this precious data and content stored in a few different places, how can you safeguard them all and keep them backed up?
You can choose between automatic and manual backups
Automatic Backups
The most efficient and reliable approach is to use an automated site backup service. In addition to not having to do anything manually, you can have:
Unlimited storage space.
Automated regular backups of the entire site, including the database, all content, plug-ins and themes, settings, and more.
Instant restores so you can revert to a previous version with one click.
Direct access to 24/7 expert support.
Manual backups
To perform a manual backup, there are two parts to backing up your store:
Back up your database! There are several ways to do this, see the WordPress Codex for your options for backing up your content. There are both manual and plug-in options.
Using SFTP go to your wp-content folder to backup your theme and plugin files. We highly recommend that you make a backup of your theme files if you have made any customizations.
Test for updates
First, let’s look at some terms we’ll be using. Some may use other terms such as development environment, test environment, and live environments, but we’ll stick to the three fundamentals:
Local – located on a personal computer, generally not accessible from the web.
Staging: This is where updates are tested. It should replicate the same configuration as the live site server.
Production – is the live site. Where customers and users visit and shop.
Keep in mind that this is a simplistic overview and there are many tools and ways to do it. There are no absolutes in how you test for updates, as long as you don’t generally check them out on a live site. If you have a developer working on your site, ask them about the steps for testing updates.
Local
Most developers will start with a local installation. But what exactly does that mean?
It means WordPress is set up on their computer and acting as a server. Using a favorite code editor, you can then create, update and test updates on your computer. While working on a local installation, we highly recommend that you start using version control if you are not. Whether it’s Git, SVN, or something else, it’s useful in case you need to get something back up and running and can even make it easier for you to deploy a site for staging and production.
Staging
To test an update beyond a local site, it’s best to create a second WordPress installation with your host and restore a backup of your live site to this. It is therefore a replica of your production site and a safe place to test for updates. A staging site can also be shared with others for their help test. Make sure to test on different devices, loading time and so on.
Production
If all goes well during the staging tests, then you can proceed with updating the site in live (production).
I recommend, when doing this type of operation, you put your site in maintenance mode to prevent people from checking out or making payments. If a transaction occurs during the upgrade, orders may be lost.
Of course, your backups are on standby to be restored in an instant if something unexpected happens. This way there is no downtime or lost revenue.
Update of extensions and payment gateways
From WooCommerce.com
To receive updates on anything purchased from WooCommerce.com, go to WooCommerce> Extensions> WooCommerce.com Subscriptions and make sure your store is connected to your WooCommerce.com account.
By connecting your WooCommerce.com account to your WooCommerce site / store you can:
View the status of WooCommerce, as well as your extensions and payment gateways
Filter by installed, activated, download and update available
Determine which extensions and payment gateways are compatible with which version / release of WooCommerce
From third party developers
Plugins, extensions, payment gateways and themes not developed and maintained by the internal WooCommerce team come from third party developers. Third party developers who want to add version control to their product can see: Adding version control support to the plug-in . Store / site owners should contact the third party developer directly for support on updates and compatibility.
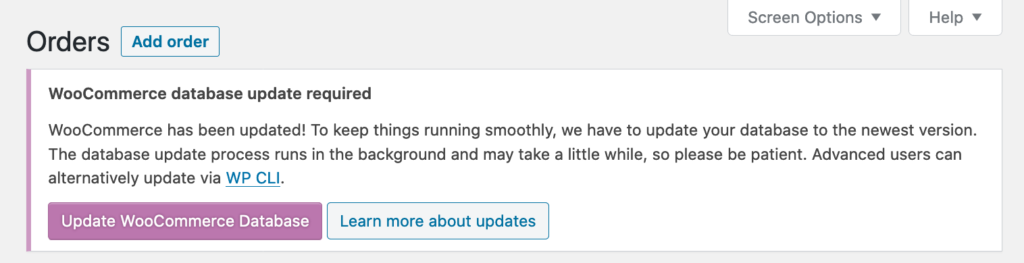
WooCommerce database update notice
Update the WooCommerce database, initiate the database update process to match the version of the plugin you have installed or updated. The database organizes, contains and stores your products, orders, posts and pages.
A WooCommerce database update warning will appear when you have upgraded to a new version of WooCommerce and a database update is required:
Make sure you have a backup in place and click the ” Update WooCommerce Database ” button. The update process will start: selecting View progress will take you to the Scheduled Actions section and the actions pending for the update will be displayed.
Once completed, the next time you view an administration page you will see the banner that says the update is complete.
Reading Time: 3minutes
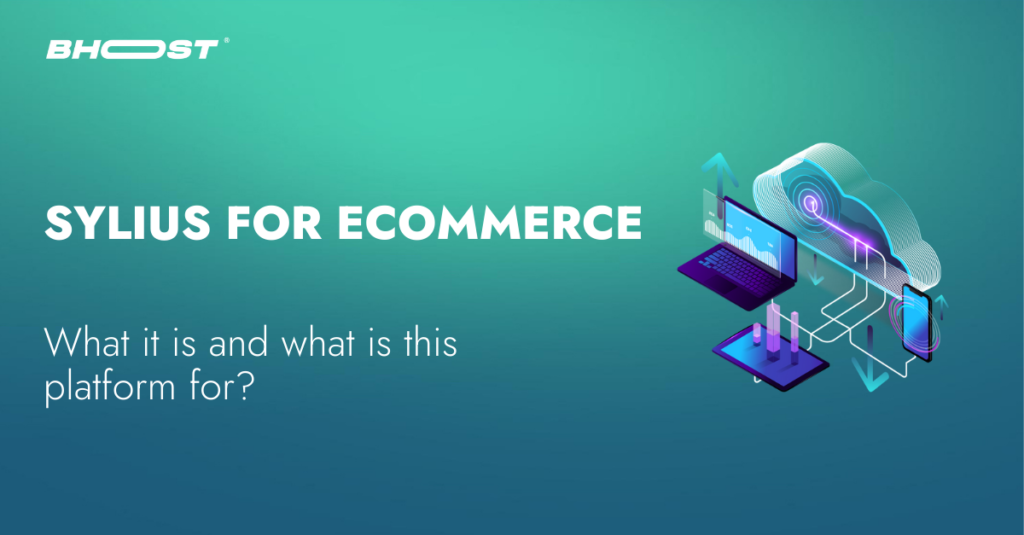
We saw in one of our latest articles this new platform that is slowly making its way: Sylius .
Most of the systems available on the market give you access to a huge number of advanced features, but extending them by applying custom solutions is sometimes quite difficult. Sylius, on the other hand, allows you to create flexible solutions. In fact, you can add new features, so that every single part of the code of your application can be adapted to your needs.
Yes, there are some features that aren’t ready for use. However, it is easy to implement them freely. The helpful community has already made many of the plugins. Sylius is based on the Symfony framework, considered by many to be the best PHP framework. It appears in two versions: Sylius (free open-source) and Sylius Plus (the paid one, but it’s worth it).
In this blog post, we’ll take a look at some details of the paid version.
There is in fact a free basic version and a somewhat complete paid version. Since we are analyzing the costs, it seems appropriate to put this version under analysis.
Sylius Plus: prices
The annual license price depends on the value of the transactions that go through the platform (Gross Merchandise Volume). The price of Sylius Plus starts at 14,900 EUR per year. It’s not just a charge for extra add-ons, it includes support from the Sylius technical team and a dedicated Success Manager.
The commercial license retains the ability to modify the solution and adapt it to the real needs of your project (as in an open-source version). After purchase, you will get the source code available as a private repository on GitHub and, like the open source license, can be modified by the developer.
Is it a good solution for your E-Commerce project?
With Sylius Plus, you’ll get features that aren’t ready to use in a free version, available on GitHub, which means faster rollout. However, it’s worth considering if you actually need this solution. You may have tons of features, but do you really need them?
Remember that Sylius still has many basic plugins, which you can add to your application to make it perfect for your needs. Many of these have been developed by the community and many new features are created all the time. With Sylius you can really create your store however you want, as there are many templates that allow for easy integrations and a unique design.
What can it bring to your business?
Most popular payment methods
Product management
Order management and customer service
A fast and accurate search for products with ElasticSearch
Out-of-the-box omnichannel support in a free and open source version
High flexibility: can be used for B2C, B2B, Multivendor-Marketplace or as a headless microservice for VOD, e-learning platforms or SaaS. Sky’s the limit.
What more does Sylius plus have?
Advanced multi-store management
Returns management
Loyalty system
Hierarchical role-based access control management
Multi-source inventory management
Customer Success Manager, (optional) project success assistance and technical support supported by SLA
As you can see then, Sylius can be a really good answer and a good alternative to the major CMS for E-Commerce. It is a solution that allows many customizations, without necessarily needing too technical skills. With Sylius you can in fact create an online store, with multiple functions and that is perfectly suited to your business.
Reading Time: 5minutes
When it comes to open source E-Commerce platforms, there are many solutions to choose from and often this choice becomes quite critical.
We have already seen in one of our previous articles, Magento and PrestaShop and what their characteristics are.
But have you ever heard of Sylius instead? If not, in this article you will learn how it works and what features it has. I will also explain how to get started with this tool and the possibilities of extending its functionality.
What does the open source E-Commerce platform mean?
An open source E-Commerce platform is software for running and managing an online business, with direct access to the source code.
Generally these solutions are free, although obviously there are collateral costs. The costs you have to incur relate to hosting, development and personalization. We can say that you decide how much to spend on each process.
Another aspect for which you can choose, according to your needs is the functionality. In fact, being able to access the source code, you can add the features you need or modify the existing ones. This clearly offers great flexibility and scalability. Like other open source platforms, those related to E-Commerce are supported by communities which can certainly be a valid help.
Sylius for e-commerce
Sylius is an open source E-Commerce platform based on the Symfony framework. It is built with decoupled components that can be used independently in any PHP application even if it doesn’t use Symfony. Then you can decide whether to use the complete platform provided by its creators or take advantage of standalone elements to create a custom solution.
This E-Commerce tool is an API-first solution. This means that Sylius can be used as a backend for implementing JavaScript E-Commerce software such as a PWA or native mobile app. You can create an online store suitable for any size of business – a small, medium or large business.
Is Sylius free?
Sylius is available in two versions:
Standard (free) using the open source MIT license
Plus (paid) with a commercial license with an annual subscription. Its amount depends on the gross volume of sales you made with this E-Commerce platform.
In addition to standard Sylius features, the paid version contains enterprise-grade features such as multi-store (allowing you to sell products from multiple business units or legal entities), a loyalty system, and returns management. Let’s now take a look at the functions of a non-paid solution.
Features of the free version
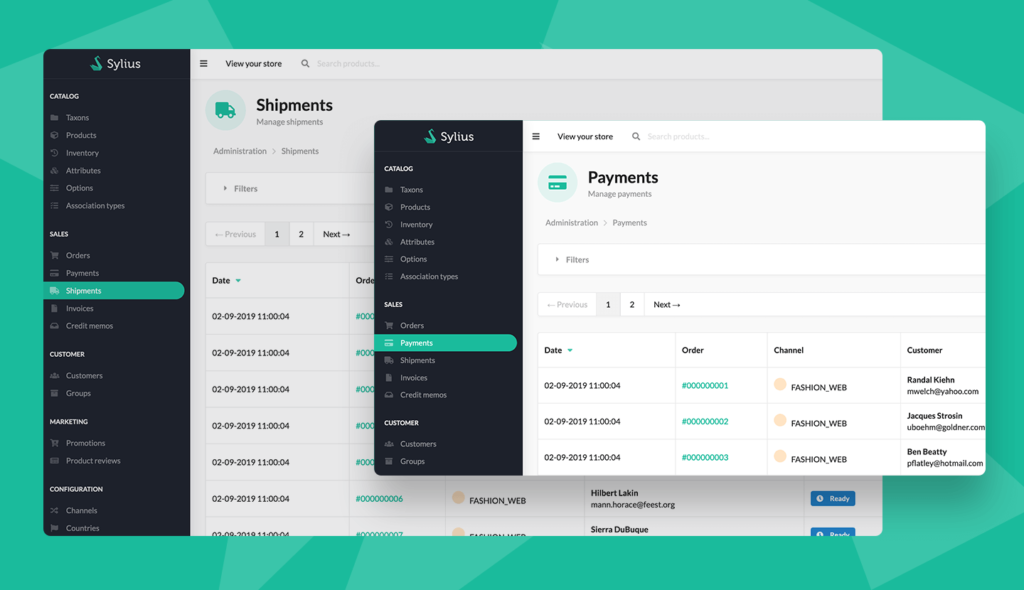
With Sylius Standard, you can create a fully functional online store with many useful features.
Order management : each order is linked to the channel (e.g. webstore, mobile application) from which it comes and to the language used by the customer to carry it out.
Taxation : You can use the right taxes for different products and billing zones.
Payments : Support for many payment service providers.
Shipments: possibility to attach multiple shipments per order.
Product Reviews : Thanks to this feature, your customers can leave opinions on the products they have purchased.
Product association : you can suggest to customers the complementary items to what they are viewing.
Sylius Themes : This is a great option when you have more than one channel for a single instance and you want each channel to look different.
This platform is perfectly suited to the needs of different types of companies: medium and large B2C / B2B companies, but also to startups with high development needs. Its flexibility and adaptability make it a platform that can be adapted to many different realities.
Why use Sylius?
Despite this roundup of features, you may still wonder why you should use Sylius? So here are 6 reasons for you:
Scalability . You can deploy Sylius on a single server or in the cloud on a self-scaling multi-server architecture, providing great efficiency for large projects.
Flexibility . It is possible to customize every part of this platform, thanks to its modern and well thought out architecture and the use of the Symfony framework. You will thus be able to tailor your E-Commerce to your needs.
Ability to apply it on multiple devices . You can easily build native mobile apps for iOS, Android, or a PWA
Perfect for developers . This E-Commerce platform guarantees the highest code quality, has a solid test environment and uses business-driven development (BDD). It means the tests are written in a business language which speeds up application testing.
Community. There are more than four thousand developers, e-merchants and other specialists working with this tool gathered on the Sylius channel on Slack. You can join them to ask for support or help others solve their problems.
Open Source. You can participate in the development of this tool.
Sylius: a headless open source platform
Headless is a word that basically describes the decoupling of the front-end of your E-Commerce from the back-end. Simply put, what sets the headless model apart is the lack of control over how the backend data will be presented to the data to the customer. In the headless approach, the most important is the content that needs to be delivered to the customer, regardless of which platform they want to access and when. To make this possible (also in Sylius), companies use APIs to synchronize data and provide control to IT teams in terms of the technology used to interact with the customer.
Basically, while in traditional ecommerce, all marketing channels, such as blog posts, newsletters, etc., are designed to bring the customer directly to the site, with headless technology, it will no longer be necessary. Purchases will be made directly from the platform through which the promotional message arrives to the customer. Will it be a mobile app, a single page app, or some other system? You don’t know, but the purchase will come by itself and that’s what matters!
Sylius plugin
The organization behind this platform has developed six open source plugins. One of them is the billing plugin which creates an invoice after a customer has created an order. Both the customer and the administrator can download this document.
In the Sylius Store you can find more than 80 different plugins and most of them are free.
There is the Elasticsearch plugin which provides the complete search mechanism, separate from the database. It allows you to lighten the store’s resources. In addition, Elasticsearch enables intelligent search and provides product filters. A developer can easily create new ones, as there are helpful guides and guidelines for making them.
Another useful extension is the CMS plugin which allows you to add a content management system to your store. Thanks to this, you can create eg. a subpage with the regulations of your online store or a better homepage.
With Odiseo’s SyliusReportPlugin , you can add a reporting interface to the platform administration. You can also easily create custom reports. As for statistical data, you can also use the Analytics Plugin which adds Google Analytics tracking to your store, or the Facebook Tracking Plugin which allows you to add Facebook Pixel to track visitors who come to your website from this channel. of social media.
Have we already talked about Sylius plugins and what about integrations with external systems? You can run it via plugin (e.g. the aforementioned Analytics Plugin) or write your own custom integration.
Custom online shop
In this article I have shown you how Sylius is a very flexible system, which allows you to really do everything with your E-Commerce. The customization possibilities of this E-Commerce solution are its biggest advantage. With the help of Sylius experts, you can have an online store entirely tailored to your business needs.
So if you are looking for a useful tool that is easy to configure on both the admin and development side, Sylius may be the one for you.
Reading Time: 2minutes
Magento 2 is the software and E-Commerce platform trusted by the world’s leading brands. The undeniable advantages of Magento 2 make it one of the most used platforms. Some typical benefits that should be named are an ecosystem of quality extensions and highly supported E-Commerce features.
In this post, we will therefore see how to update Magento 2, so that you can be completely autonomous in this.
Step 1: Back up your store
Creating backups for your Magento 2 site is a fundamental element because it allows you to protect all data through the Backup Manager, in case of changes or interruptions on the site.
Step 2: Activate maintenance mode
Once the backup is done, you should put your store in maintenance mode while updating. To enable maintenance mode:
php bin/magento maintenance:enable
This will create a new var / .maintenance.flag file. If you can’t disable maintenance mode, you can remove this file
Step 3: Upgrade to Magento 2
In this case, we will do an update to Magento version 2.2.1. See the latest versions on the Github download page .
Step 3.1 Pull package
First using the following command on the terminal / command-prompt:
Notes:
In Ubuntu / Debian Linux, when you encounter authorization problems, remember to insert sudo at the beginning of each command as sudo composer update.
Step 3.5 Disable Maintenance Mode
You turned on maintenance mode in step 2, now you need to turn it off. Run the following command line to disable it:
php bin/magento maintenance:disable
Step 4: Check the current version of Magento 2
After that, you can check the Magento 2 version by running the command.
php bin/magento --version
If the system shows the cache write permission error, add the following command to grant write permission to the pub and var directories:
chmod -R 777 pub var
Frontend login problems after update: how to fix
You may receive this message: “We’re sorry, an error occurred while generating this email”.
This is due to the read-write permissions for the web server. Run the following command to fix it:
find var vendor pub/static pub/media app/etc -type f -exec chmod u+w {} \; && find var vendor pub/static pub/media app/etc -type d -exec chmod u+w {} \; && chmod u+x bin/magento