Reading Time: < 1 minute
Multiple_vulnerabilities_in_PrestaShop

Three very important vulnerabilities have been detected in Prestashop: two of the SQL injection type, one of critical severity and the other of high severity, and another high-severity XSS injection vulnerability, which could allow any user with administrator permissions to write, update or drop SQL databases regardless of their permissions.

You can see the statement here.

Detail:

The critical severity vulnerability is SQL filtering, which could allow a user to write, update, and delete the database, even without having specific administrator permissions.

Of the high-severity vulnerabilities, one affects arbitrary file reading, which makes it possible for a user with SQL manager access to arbitrarily read any file in the operating system with a SELECT function. The other high-severity vulnerability consists of a possible XSS injection, which could facilitate the hijacking of HTML elements without the need for user interaction.

Solution:

Prestashop has released a patch and recommends updating to versions 8.0.4 and 1.7.8.9.

https://build.prestashop-project.org/news/2023/prestashop-8-0-4-maintenance-release/
https://build.prestashop-project.org/news/2023/prestashop-1-7-8-9-maintenance-release/

The only current way to apply the patch is to update the version of Prestashop to the indicated ones.

If you have a Prestashop 1.7.X you must update to 1.7.8.9

If you have a Prestashop 8.X you must update to 8.0.4

That’s it, folks! Check out our blog for more information.

Reading Time: 5 minutesDropshipping is a very unique business method, where a company doesn’t stock the products it sells. When a dropshipping reseller sells a product, they buy it directly from a third party (a manufacturer, wholesaler, or other retailer) who ships the product directly to the customer.

In essence, this method allows you to have no inventories in stock and to buy only what is sold.

So if your business is dropshipping, you act as a showcase that customers visit and order products from. Once they place an order, the customer pays you and you pay your reseller accordingly.

How does Dropshipping work?

Dropshipping is a supply chain management method. (If you’ve recently opened a retail business or online store, a supply chain is a network of suppliers, materials, manufacturers, and retailers involved in creating and distributing a product, from manufacturing to delivery to the customer.)

You will buy the goods from your retailer, only after you have closed the sale. If you think about it, this system can only bring advantages, because you will avoid warehouse inventories, you do not have to advance money for goods that you do not know if you will sell and you do not need a warehouse where to store the goods.

dropshipping

But now let’s see in detail what are the parties involved in dropshipping:

  • Manufacturers create products. Normally these do not retail, but wholesale to wholesalers and retailers.
  • Wholesalers buy products from manufacturers and then tag them before selling them to retailers. Wholesalers usually stock products from a variety of manufacturers.
  • Retailers sell products directly to the public, with a markup.

Here’s how it works:

  • The customer places an order and pays you, the retailer.
  • The retailer notifies the dropshipping partner (manufacturer or wholesaler)
  • The latter packs and ships the product to the customer and charges you, the retailer, for the service.

In general, the shorter the supply chain, the greater your profits will be because there are fewer parties involved. A short supply chain is one in which you deal directly with the producer.

What are the benefits of dropshipping?

Dropshipping, as you have seen, is a method of managing your business and your inventory, which can help your company significantly reduce risks. Just think that you will no longer have to worry about having bought more goods than you will sell.

But there are other advantages too …

This order fulfillment method is very popular for E-Commerce businesses or other companies looking to mitigate inventory risk and increase business flexibility. Are you wondering why?

  • Reduces the costs of starting and maintaining a business: Dropshipping drastically reduces the initial costs of starting an online business since there is no need to invest upfront in creating inventory.
    This is certainly a very positive aspect for small and new businesses because you will not have to invest capital in the large purchase of goods and above all you will not need a warehouse.
  • Your location can be flexible: Dropshipping businesses can also be more agile than businesses with more traditional structures. Since you don’t have physical inventory, you can pretty much run your store from anywhere you find an internet connection.
  • You can offer customers a wider selection of products – since you don’t have to invest in building your inventory, you can stay on top of trends and quickly add new products to your site. You can also quickly change your offers without first having to order new items or empty stock.
  • You don’t have to manage inventory – a lack of inventory also means you won’t have to manage it. Inventory management can be complicated and time-consuming (although inventory management software can make the job a lot easier). Not having to look at inventory, reorder and process it means that you and your employees have more bandwidth to work on other aspects of your business to help it grow.

So as you can see, there is a significant cost reduction but also a better business organization and time. Time and resources that you can use for other sales activities.

How to select a dropshipping supplier

The third party you choose as your dropship supplier will determine the success of your supply chain, so you need to do your due diligence during the selection process.

scelta-fornitore-dropshipping

Generally, you want to set up dropshipping agreements directly with the manufacturers of the products you want to sell. The fewer intermediaries there are, the greater your profits will be.

Here are some questions to ask potential suppliers:

  • How much? If the wholesale price isn’t enough to make a decent profit from the products, look elsewhere.
  • Is there a management fee? if so, consider how it could affect your profit margin.
  • How are the products shipped? you want a partner who ships items via a service that provides tracking numbers (which they should send to you). This way, if your customers ask about the status of their orders, you can provide them with accurate and up-to-date information.
  • What is the billing process? Do drop-shipping partners charge your credit card as soon as you place an order? Or do they send you a monthly invoice? Make sure you choose a partner whose billing process fits your cash flow.

Conclusion and best practices

As we have then, Dropshipping is a good business strategy, especially for those who start from scratch or have small businesses, because it allows you to significantly reduce costs and inventory management activities.

But are there some best practices you can use to ensure the success of your drop shipping business? Of course! Let’s see the most important ones, which you absolutely must consider.

  • Make online shopping enjoyable: From ordering to delivery, you need to be able to make the sales experience as simple as possible. Your store must therefore be as intuitive as possible and therefore easy to use for your customers.
  • Inform the customer: immediately give the customer all the info, once the order is placed, related to the shipment and when their package will arrive.
  • Choose your products carefully: While dropshipping allows you to sell a wide variety of products, that doesn’t mean you should sell everything. Do market research and analyze trends to determine what you should be selling in your store. Think carefully about what’s marketable, what’s easy to ship, and what’s hard for people locally to find.
  • Focus on Quality: Even if you check a supplier thoroughly, you should remain vigilant about service once you work together. For example, if you have multiple incidents of damaged products, lost packages, or late deliveries, cut off your supplier relationships or risk losing your customers’ trust.
  • Build a Trustworthy Business – Your reputation is everything, so not only do you need to deliver on your promises with reputable dropshipping partners and a great website, but you should also work to increase your online credibility to ensure customer trust. From building a strong social media presence to building successful email marketing campaigns. This will lead you to build strong relationships with your customers and this will help ensure the success of your dropshipping business.

That said, all you have to do is give it a try and get started with your business. Good luck!

That’s it, folks! Check out our blog for more information.

Reading Time: 5 minutes

A website, especially in e-commerce, must respond quickly to the user. Therefore, this guide will show you how to optimize Shopware’s performance.

Some tricks can be useful to improve the performance of your Shopware website. But let’s start by seeing together what they are.

Choose a suitable Shopware hosting provider

A hosting provider should be reliable, efficient and secure. Furthermore, it should be able to offer its customers the possibility to update their hosting plan during the construction phase, if they need a more performant resource. In essence, the customer must be able to modify their offer according to the development and growth of their shop.

Not to mention that the support part must be fully effective. Continuous support can give you feedback in the unfortunate event that problems arise. Unfortunately, it can happen online. The important thing is that your provider can give you immediate and effective support.

Therefore, when choosing your hosting provider, you should consider the following arguments:

By choosing the right hosting optimized for your platform, you can guarantee an efficient and fast service, so that your customers are fully satisfied.

How to Measure Performance

The first step is to measure performance so you can identify critical issues and know where to intervene.

When measuring the store’s performance, loading times can only be an indicator of the expected performance level. The features present in your store, ranging from item counting to internal structure or momentary capacity utilization, will always have a significant influence on loading times.

Measuring Performance with Firebug

To generate comparable measurements, we recommend installing the Shopware demo data plugin before running tests in your store. Firebug is a browser extension that can be installed directly through your browser. If installed, it will display the loading times for each component of the page in the browser’s network tab.

Particularly relevant are the loading times of the entire web page, most likely the first item in the list. To collect relevant measurements, it is necessary to load the target page multiple times, listing the pages and noting all the loading times.

Measuring Performance with the Apache Benchmark

To call the benchmark using a Linux shell, use the following command:

Shopware-apache

Here you should choose the average of all connection times (= total time).

Optimizing MySQL Configuration

The default configuration of many distributions is not ideal for production environments. But don’t worry, there’s a script for that! “Mysqltuner” provides suggestions for non-optimal configuration and parameter settings.

Shopware-script-performance

Tips for Improving Performance

Standard Sorting for Category Lists

If you have defined your sorting criteria, you should make sure that there is an index in your database for each of the columns in the table.

Changing Your Update Strategy

There are several processes active when you access one of the pages of your store. For example, SEO links are generated, the search engine cache is generated, and the data necessary to display best-selling items or other items of interest, based on similar customer behavior.

So you need to consider whether or not all of these features can be useful to your store.

For example, you can consider changing the update strategy from “live” (request per page) to “cronjob” (cumulative, timed). To do this, go to Configuration –> Cache/Performance –> Cache/Performance –> Settings (tab).

Look for the entries SEO (1), Search (2), Top sellers (3) and Referral Marketing (4) and you can make your changes directly. To use the cronjob features, you will need to first install two custom plugins, “Cron” and “CronRefresh”. With these plug-ins, you can control the timing of server requests and you should schedule them, most likely at night.

Enabling HTTP Cache

With Shopware, you can use caching instead of retrieving all data from the database in real-time for each user. Since each database access uses scarce web resources, consider also enabling http-cache. This will create a cache file, which incorporates the most important information from the article list and its detail page, thus preventing unnecessary database queries. This will also make browsing your store much faster and therefore more enjoyable.

With the cronjob we created above, we made sure that the cache file does not grow too large, as it is regularly deleted (default value: every 24 hours). This has proven to be quite practical as the HTTP cache could grow by 1-2 GB per day if used frequently.

Activate the HTTP cache via Configuration –> Cache/Performance –> Cache/Performance –> Settings (tab) > HTTP Cache and check the plug-in and all changes made for compatibility with your store.

We recommend running a test before activating the changes made.

Plugin Inspection

There are many cases where the use of plugins has had a serious impact on the performance of a store. To check whether or not a plugin can affect the performance of your site, it might be a good idea to disable all third-party plugins and compare the performance of the front end with and without plugins activated.

An easy way to do this is to run an SQL query in a test environment. Both queries shown below can be executed in phpMyAdmin and will disable a plugin that is not part of the default Shopware configuration.

query-plugion-shopware

Alternatively, you may want to use the plugin safe mode provided by the Plugin Manager from Shopware 5.3 onwards.

Once the store is running smoothly again, you can try to identify the plug-ins that are affecting your store’s performance by reactivating third-party plugins one by one. You can also reassess the need for each plug-in and tidy up your store’s backend a bit.

“Debug” Plug-in

Out-of-the-box Shopware comes with a “Debug” plug-in that can monitor and compare individual processes on a server. It will provide you with sufficient information on e.g. page request durations and will indicate processes, e.g. database queries, controllers, etc., that could slow down individual requests.

System Check

Shopware collects information about your system configuration and lists it in Configuration –> System Information. Here you will find entries like “memory_limit” (1). Exceeding the memory limit e.g. will harm performance. Keep in mind that memory limits can be changed and virtually enlarged, making a thorough examination of your system worthwhile.

Compiler Caching

By going to Configuration –> Theme Management –> Settings, you have the option to disable compiler caching. This is generally recommended during the normal production cycle of the store. Since compiler caching slows down a store considerably, it should only be used during development and infrastructure changes.

Source: Docs Shopware

That’s it, folks! Check out our blog for more information.

Reading Time: 3 minutesCDN stands for Content Delivery Network , but what exactly is it and what is it for? In this article, I will try to explain how it works and why it is so important for your E-Commerce site.

To understand the concept well, we must first analyze the problem for which the need to have this tool arose. The problem is latency,  that is, that annoying delay that can occur in the period of time between when we ask to load a web page to the moment in which the content actually appears on the screen.


cdn-con-senza

Source: Imperva

A CDN’s mission is to reduce and improve site rendering speed and performance.

How does a CDN work?

In essence, a CDN can be schematized as a sort of network of servers , connected to each other . The primary goal of this link is to deliver content in the fastest and cheapest way, but also securely .

To minimize the distance between visitors and your website’s server, a CDN stores a cached version of its content in multiple geographic locations (i.e. points of presence or PoPs). Each PoP contains a number of caching servers, which are responsible for delivering content to visitors in its vicinity.

Essentially, this tool puts your content in multiple places at once , providing superior reach to your users. For example, when someone in London accesses your US-hosted website, it is through a local PoP in the UK. This is much faster than having visitor inquiries and your responses travel the full width of the Atlantic and back.

Why is it so important?

As you know, a site that loads its content slowly is not well seen by users and even by Google . In fact, the more the site slows down, the more there will be the real possibility that users will abandon it. Thanks to the CDN, on the other hand, you can significantly reduce loading times.

In fact, thanks to this tool, which is distributed globally, it is possible to reduce the distance between users and site resources. In essence, the CDN makes sure that users can connect to a datacenter closer to them, having faster response times.

Not to mention that the CDN can reduce the amount of data transferred, by reducing the size of the transferred files, thanks to the minification and compression of the same.

Who Uses the CDN?

To date, more than half of all traffic is served by the CDN, but these numbers are set to increase. The reality is that if any part of your business is online, there is little reason not to use a CDN .

However this tool is not for everyone. In fact, if you run a strictly localized website, with the vast majority of your users being in the same region as your hosting, having a CDN doesn’t yield much benefit. In this scenario, using a CDN can actually degrade the performance of your site. So a lot depends on your business and where your customers are located.

However, most websites tend to operate on a larger scale, making using the CDN a key choice.

The CDN has therefore become very popular in the following marketing, e-commerce, online gaming etc.

Security: data protection

Data protection is a fundamental element to take into consideration and with the CDN, the protection part is very active. Thanks to the updated TLS / SSL certificates , it is possible to guarantee a high level of data protection.

Start using the CDN

For a CDN to work, it must be the default inbound gateway for all inbound traffic. To do this, you will need to change the DNS configurations of your main domain (e.g. domain.com) and those of your subdomains (e.g. www.domain.com, img.domain.com).

For your primary domain, you’ll change its A record to point to one of the CDN’s IP ranges. For each subdomain, change its CNAME record to point to a CDN-provided subdomain address (for example, ns1.cdn.com). Either way, this involves DNS routing all visitors to your CDN instead of being directed to your original server.

If any of this confuses you, don’t worry, because if you need to activate and configure the CDN, we’ll take care of it! Contact us.

Reading Time: 7 minutesWooCommerce vs Magento are both very successful platforms, especially in recent years. This is because they are platforms constantly focused on the development of their products so that they can be more and more usable for their customers.

That is why it is very difficult to choose between these two CMSs. Each has its strengths and disadvantages.

In this article, therefore, I will try to give you all the information that may be useful for you to understand which platform between the two is more suitable for you and your online business.

Magento Vs Woocommerce

What is Magento?

We already talked about a few articles ago, what Magento is, how to optimize it and much more. But let’s do a little review of this platform, so multifaceted.

Magento has steadily gained a high reputation so far. It was born on August 31, 2007, and has released multiple versions and product updates over the years. According to BuiltWith, 750,161 websites are Magento customers; 186,720 live websites using Magento; and 563,441 sites that have historically used Magento.

Built to develop an effective business, Magento comes with a wide range of strengths. These include ready-to-use features, customization capabilities, and seamless third-party integrations.

What is Woocommerce

We also talked in previous Woocommerce articles, about how much e-commerce costs with this platform and much more that you can find in our blog.

WooCommerce is a powerful plugin built into WordPress, an open-source software system for creating beautiful websites and blogs. Launched in 2011, WooCommerce has made continuous progress. Currently, WooCommerce hosts over 4.7 million websites around the world.

Concerning websites that use e-commerce solutions, WooCommerce represents the highest share of distribution with 26% while Magento is in third place with 8%. Generally speaking, these two platforms are among the most popular websites.

Although Magento and WooCommerce both aim to provide a dynamic business environment, there are significant differences between them. With either CMS, you can connect to thousands of potential customers in major global markets like Amazon, eBay or Etsy. The process of managing all data can be well managed on a single dashboard. Why not give it a try?

But let’s see in detail the comparison between WooCommerce and Magento.

Magento and Woocommerce: the comparison

Performance

When it comes to website performance, loading time and availability are of great importance as they are factors that can make your online business successful or not. The slow loading times and the “impossible to reach” status will surely give an unpleasant experience. Unfortunately, it takes very little for a customer to decide to leave your site. This is why it becomes essential to have a site that responds well to user indications.

The higher the loading speed, the more likely customers are to leave your website and move on to other competitors. Therefore, it will significantly reduce the average page time of your website and negatively impact your website’s SEO ranking.

Woocommerce performance

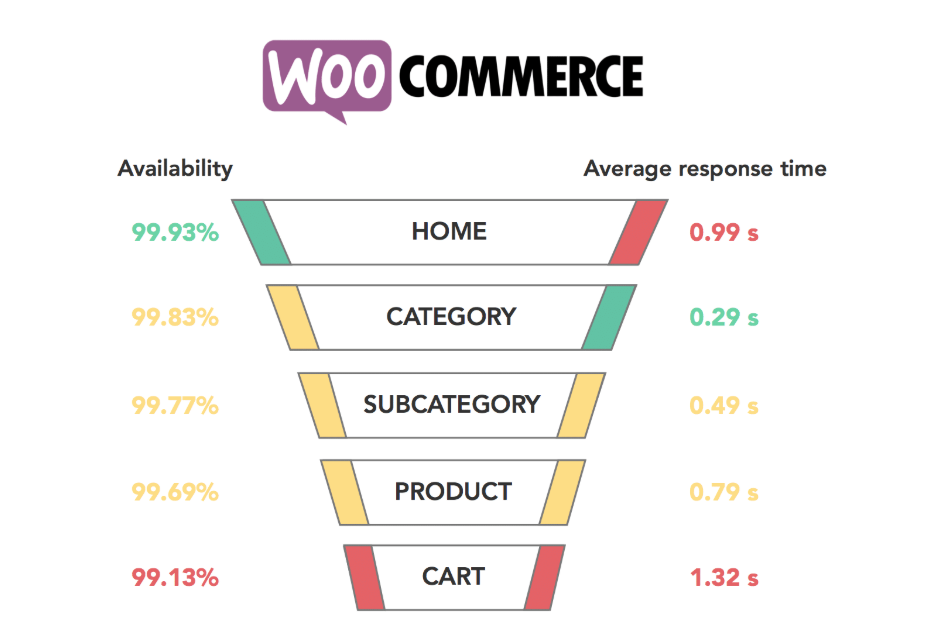
Although WooCommerce also possesses quite high availability like Magento, its response time is slow. The average page load time of all sites is 776 milliseconds, specifically the shopping cart page which takes 1.32 seconds to reach.

WooCommerce and Magento both may have some loading time issues. According to an analysis of the performance of the e-commerce website, the loading speed of these two platforms does not live up to expectations and this is due to the multiple features and customizations they can have.

Woocommerce vs Magento

Magento Performance

The backend, or the time it takes the CMS to generate the HTML code and send it back to the browser, is where speed and availability are measured. This work is applied to every page of every website, from the home page to the shopping cart.

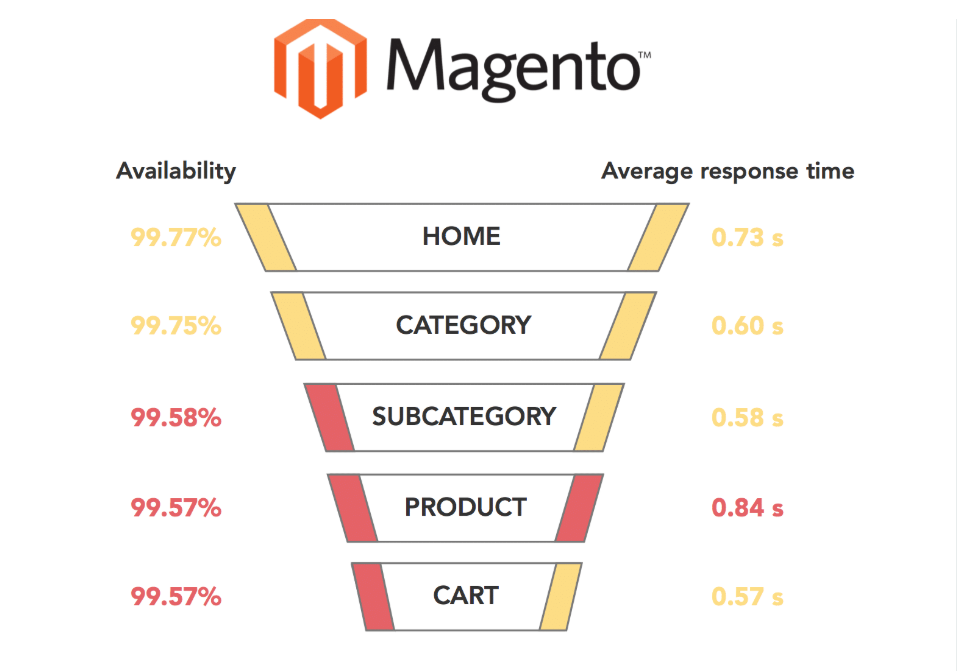
Magento was found to be quite stable with an average availability rate of up to 99.71% despite the high traffic (3000 visitors per day). However, the speed is not that high.

Magento-prestazioni

The graph shows that the average page load time is 665 milliseconds with high availability. Loading the online shopping cart takes a reasonable amount of time with 568 milliseconds. In correlation with its complex machine, this is understandable. This isn’t fast-paced but it doesn’t discourage users either.

Magento developers always expect to improve Magento performance and make extensive use of caching of page content and static resources on the server to speed up response times in Magento 2.0 and above. Therefore, the page loading speed is further improved.

Magento has a better loading speed than WooCommerce. As a result, users will find it more enjoyable while browsing Magento stores.

Extensions

Extensions are features built into stores to improve and extend the functioning of websites. WooCommerce and Magento are both known to have a large number of add-ons that improve the functionality and appearance of the website.

plugin-woocommerce

WooCommerce gives you access to over 55,000 free WordPress plugins and themes. You can customize your E-Commerce store in terms of product type, store management, marketing, payments, shipping, enhancement and subscription. Plus, it’s easy to integrate them into WooCommerce stores.

Magento Extensions

Likewise, Magento boasts a huge range of free and non-free third-party extensions and this is thanks to Magento’s fabulous community of developers, agencies and freelancers.

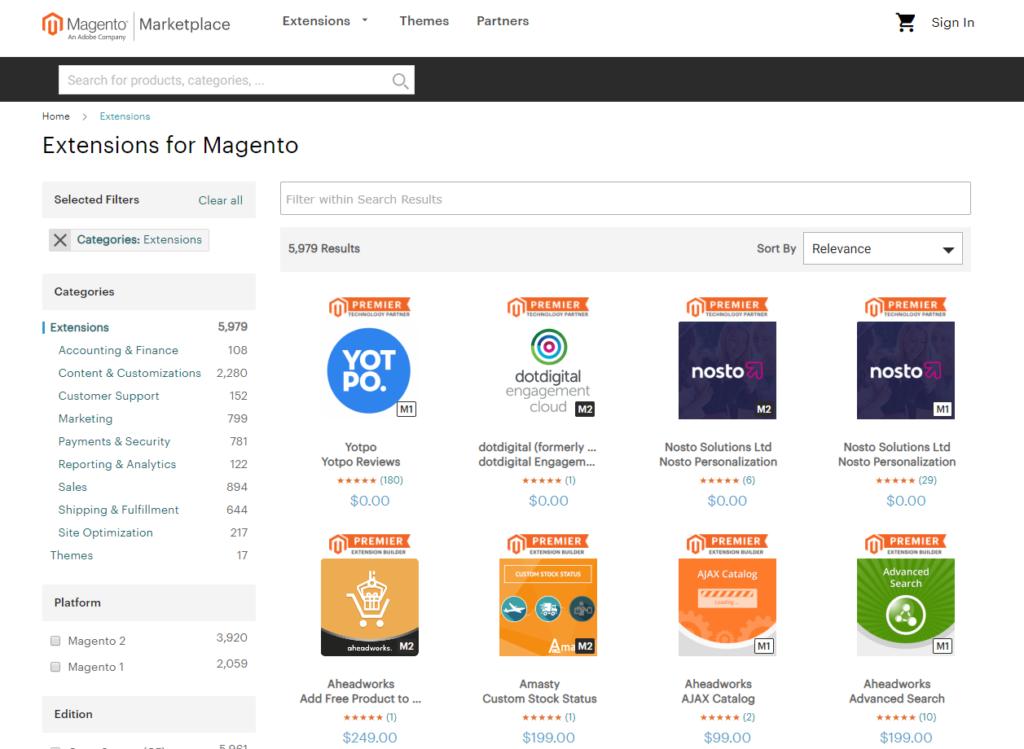
At present, the Magento marketplace has nearly 6,000 extensions for various factors such as accounting and finance, marketing, sales, payment and security, content and personalization, site optimization, reporting and analytics, and customer support.

Woocommerce vs Magento,magento-marketplace

Easy to use

WooCommerce Ease of use

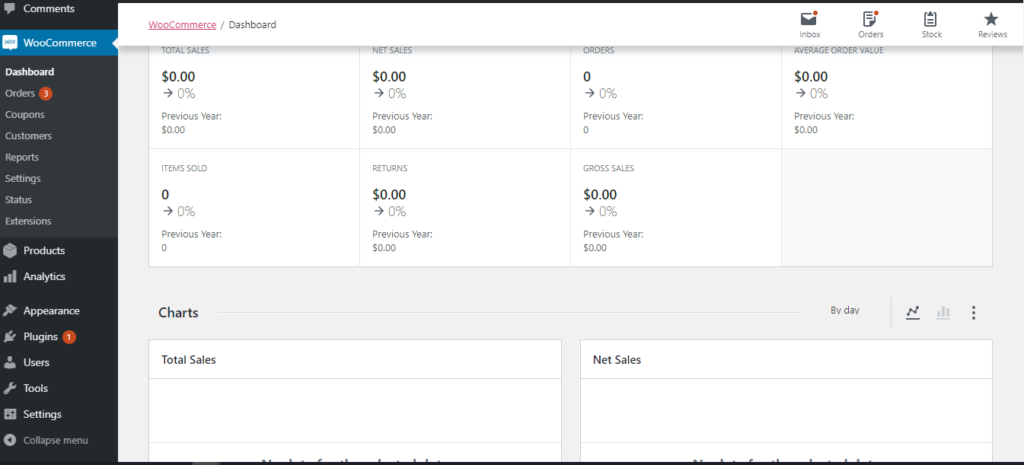
This platform is aimed at beginners and users who are inexperienced with E-Commerce, so WooCommerce developers always try to make it as beginner-friendly as possible for their users. Almost all WooCommerce users have stated that this website is pretty easy to use, especially when interacting with the WooCommerce interface.

woocommerce-dashboard

The platform is highly customizable with the WP-Admin dashboard. You can easily customize your website with theme options that allow you to change the colour of your design, add different features to your store, and insert images or videos.

WooCommerce also allows you to add an unlimited number of products and customers to the store. To make it easier for users, WooCommerce comes with a setup wizard that will guide you through the initial setup such as creating pages, setting up payments, choosing currency, and setting shipping options and taxes. This platform offers a lot of help for almost everything.

Setting up and managing a new store from scratch without having any experience in eCommerce stores will become a lot easier with this WooCommerce development service.

Magento Ease of use

On the contrary, Magento is tailor-made for web development professionals and medium and large-scale online stores. It requires that users have at least basic technical knowledge to use. Therefore, amateur users may find it difficult. When we need some Magento tweaks, experienced developers are usually involved.

Woocommerce vs Magento,Magento-admin

The Magento store setup process can be tricky for new users even though multiple setup guidelines and tutorials are provided (most are written for developers and not DIY users). After installation, you still have to spend some time finding ways to set up extensions and customize themes as it’s not that simple.

Many online guides can give you support and this is because as I told you the community is very active. Among these, you will also find Magentiamo, a portal entirely dedicated to Magento, where you can find lots of information and tutorials for working with this CMS.

Safety

When it comes to website security, we have to be very careful. On websites especially e-commerce ones, there is a lot of sensitive data to protect. This precious data must therefore be protected in every way. Otherwise, you can ruin your website’s reputation and discourage visitors from returning. On the other hand, if your website is highly secured, you’ll keep your long-standing reputation and your customers as well.

WooCommerce security

WooCommerce remains fairly secure and there are no marked security issues in WordPress. The core of this system has come a long way in development, so it’s pretty safe. Problems can only occur when third parties are involved in creating extensions.

Magento Security

Magento prioritizes the security of your online store. It offers a comprehensive set of features and frequently releases dedicated security patches to address vulnerabilities.

Furthermore, many built-in security measures are accessible, to protect Magento installations and management. In particular, these measures could improve password management, improve the prevention of cross-site scripting attacks and clickjacking exploits, and adopt more flexible file system ownership and permissions.

To sum up, Magento and WooCommerce meet security standards. However, both could be vulnerable externally as well. In this case, Magento appears to be safer with its qualified security extensions.

WooCommerce vs Magento: Which is Best?

WooCommerce and Magento are both really good E-commerce solutions.

Choosing the ultimate solution for your future online store will never be easy, as no single platform fits every user’s needs perfectly. However, you may find the one that works best by choosing the one that has the functionality you need for your store.

While WooCommerce is intuitive and quite low-cost, Magento has a higher cost but offers users high security and high performance. While WooCommerce is more efficient for small-scale stores, Magento works best with large companies.

WooCommerce is a great option for starting an online store, Magento offers a more robust platform for businesses with long-term growth plans. Magento’s comprehensive features and scalability empower you to build a successful online store that can adapt to your needs.

That’s it, folks! Check out our blog for more information.

Reading Time: 3 minutesDespite its many competitors, Facebook still remains the king when it comes to social media. Here then most WordPress websites could actually benefit from learning about WordPress integration with Facebook.

In fact, Facebook offers many features that together with WordPress can really make a difference.

In this post, we’ll explore five different ways to integrate WordPress with Facebook, including the tools you need to use and brief tips on how to put them into action.

1. Add Facebook reactions to WordPress

The reactions have been on Facebook for some time now. It is basically a set of emoticons that represent how users feel about a particular post or publication.

facebook-reazioni

These emoticons allow Facebook users to share how they feel about the posts in question, without having to comment on them. It is much more flexible than the Like system and requires no effort.

As for WordPress, you can achieve a similar effect by using the DW Reactions plugin.

This tool allows you to embed a reaction system almost anywhere on your WordPress site. The design is very similar to the Facebook version and includes over 300 emojis from which you can choose your reaction style.

The plugin also keeps track of how many people choose each reaction and shows it to others, so that everyone can see how the community is feeling about a particular post. It’s super easy to set up.

2. View page feeds in your posts and pages

A Facebook feed is essentially a collection of publications organized according to their category. For example, every time you log into the platform, you are greeted by a news feed, and when you log into a profile, you are looking at a user feed.

The integration of Facebook feeds into WordPress allows us to display this information as part of a page or as a widget. This can be useful if you want to share a particular feed with your visitors or integrate your timeline as a widget. The latter also allows you to promote your Facebook account without being too intrusive.

We can do both of these things using the Facebook Feed WD plugin, which supports publishing page feeds, public groups and profiles.

3. Allow users to log in using their Facebook profiles

This particular approach on how to integrate WordPress with Facebook is quite interesting. Facebook allows third-party apps to use their login feature, which means users don’t have to create a new account with your website to log in. All they have to do is authorize the use of their Facebook account information.

From a practical point of view, this is an excellent proposition. Most of us interact with so many sites and websites on a daily basis that keeping track of individual accounts can be a hassle. Also, it may happen that some users who may not have wanted to register under normal circumstances do so when they see you offer a Facebook login feature.

Implementing it is also quite simple. It is, as you may have guessed, a plugin – Facebook Login.

To enable the feature on your site, you first need to get a Facebook App ID . Once you get it, follow the rest of the steps described in the plug-in’s official instructions. They are quite simple, don’t worry!

4. Add a Facebook Like widget

Facebook “likes” need no introduction. They are the system that ultimately generated the most complex reactions we discussed during the first point and a fantastic way to increase engagement. To clarify the point, ask yourself this: When you browse Facebook, you are more likely to be interested in a publication with a lot of likes.

As for WordPress, you can see how many likes your Facebook page has, which in turn tells users it’s worth following. There are a myriad of ways to do this. In fact, you will find many plug-ins that can be right for you.

5. Show your Facebook comments in WordPress

The Facebook and WordPress comment sections aren’t that different if you take them literally. However, the former has two distinct advantages over the latter.

First, it allows people to comment using their existing accounts, which works well with the Facebook login method we discussed earlier. Second, by using Facebook comments, you also have access to their built-in Like feature, which pushes popular comments to the top. This, in turn, could help foster discussion about your posts.

To add this functionality, we recommend that you use the WordPress Facebook comment plugin. In addition to allowing the implementation of Facebook comment sections, it also gives you many customization choices.

You can set how many comments should appear, how they are positioned, where the section appears and even its background color. To set things up, you’ll need a Facebook App ID. Then you can follow the plugin’s official documentation to set up everything else.

Reading Time: 3 minutesIntegrating WooCommerce into Facebook Shop is a great way to increase your sales. In fact, especially with the pandemic, the E-Commerce world has had an incredible surge and many companies have decided to also exploit electronic commerce.

So all those who have decided to open an E-Commerce often also link to social platforms, such as Facebook. With this tool, you can facilitate the purchase process by improving the user experience. Not to mention that this also generates more engagement, which helps you turn that buyer into a loyal customer. But that is not all.

Woocommerce as you know is a free plugin, with which you can transform your WordPress into an E-Commerce. In addition to creating an online store, however, as I told you, you can connect Facebook and exploit its potential to increase your sales.

In fact, many people spend their spare time on social networks and Facebook in particular collects a specific circle of potentially buyers. So let’s see we can integrate Facebook and Woocommerce quickly and easily.

Integrate Facebook with Woocommerce

The integration process makes use of 5 fundamental steps. Let’s see them in detail.

Step 1 – Woocommerce installation

First you will need to have your site in Worpress and then you will need to install and activate the plugin in Woocommerce.

To do this you simply have to go to:

  • Plug in
  • Add New
  • Search for “Woocommerce”
  • Select “install now”
  • Once done, click on “activate” to activate the plug in

For more info, you can read our guide ” How to install and uninstall Woocommerce ”

woocommerce-installazione-plugin

Step 2 – Facebook plugin installation for Woocommerce

After installing the plugin in Woocommerce and above all setting up your E-Commerce, having structured the catalog and the showcase of your stores, you can exploit the potential of Facebook to increase sales.

In fact, you can take advantage of your Facebook page not only to make your products known to the whole public, but you will give the opportunity to buy the products in your store window.

To do this you will need to:

  • Plug in
  • Add New
  • Search for “Facebook for Woocommerce”

Step 3 – Activating the plug-in

  • Go to the “Plugins” section
  • Click on the “Upload Plug in” button
  • Select “install now”
  • Once done, click on “activate” to activate the plug in

Step 4 – Connection

After that you will have a new menu item called “Marketing” in your WordPress admin panel. Go to Marketing – »Facebook and then click on the“ Get Started ”button.

tep 5 – End of Facebook and Woocommerce integration

This will take you to a screen where you can link your Facebook page and WooCommerce store.

At this point you can create your product sheets in the Shop section of Facebook and thus take advantage of the great opportunities that this platform can give you. In fact, by taking advantage of the visibility of facebook, you can greatly increase your sales. You will be able to present your products, tag cards etc.

Then consider that this plugin also allows you to automatically load the product sheets that are on your site and put them directly in the Facebook Shop section. To do this you must:

  • Go to WordPress “settings”
  • Click on “Integrations”
  • Click on “start” to start the configuration

And that’s it!

Reading Time: 4 minutes

Shopware 6 offers you the possibility to expand the range of functions and in this article, we will show you how to install an extension for Shopware. To do this, go to Extensions > My Extensions and manage the extensions already available for your store. You can purchase new extensions in the store.

Install extension shopware

The My Extensions area is divided into several subsections.

  • Apps (1): Shows an overview of the apps available in the store and your account.
  • Theme (2): Shows an overview of the themes available in the store and your account.
  • Recommendations (3): Here you will receive recommendations for extensions, divided into regions and categories.
  • Shopware Account (4): Here you can link your shop to your Shopware account.
  • Upload Extension (5): If you have an extension as a zip file, you can upload it here.

Now, to get a better understanding, let’s see the sections in detail.

App

The apps section gives you an overview of all apps added to your store.

Apps

The App section provides a clear overview with several columns for easy navigation:

  • App overview (1): Here you can see an overview of all apps and the most important information about each app.
  • Hide Inactive Extensions (2) – Use this button to hide all currently not activated apps to get a better overview of active apps.
  • Sorting (3): This section allows you to define the sorting criteria for the overview.
  • Active button (4): with this button, you can activate or deactivate installed apps. Unlike uninstalling, deactivation has the advantage of not losing the settings made in the app.
  • Install App (5): Uploading an app or purchasing one in your Shopware account does not automatically install it in your store. You can install the app using this button. Please note that the app is initially deactivated after installation. If you want to use it right away, you need to activate it right away.
  • Button “ … ” (6): Here you can call up the shortcut menu for the respective apps. The menu functions available depend on the app’s status, allowing you to better understand how they differ.
  • Uninstall: Uninstalls the app but does not completely remove it from the system so that it remains in the overview. This option is available if the app is installed.
  • Remove – Removes the app from the system. You can only use this option if the app is not yet installed or has been uninstalled.
  • Configuration: Open the configuration menu. This option is available for apps that use their configuration menu (e.g. the PayPal app).
  • Upload extension (7): Here you can manually add an extension to the store. For instance, you can download the necessary zip file directly from the extension manager of your Shopware account.

Theme

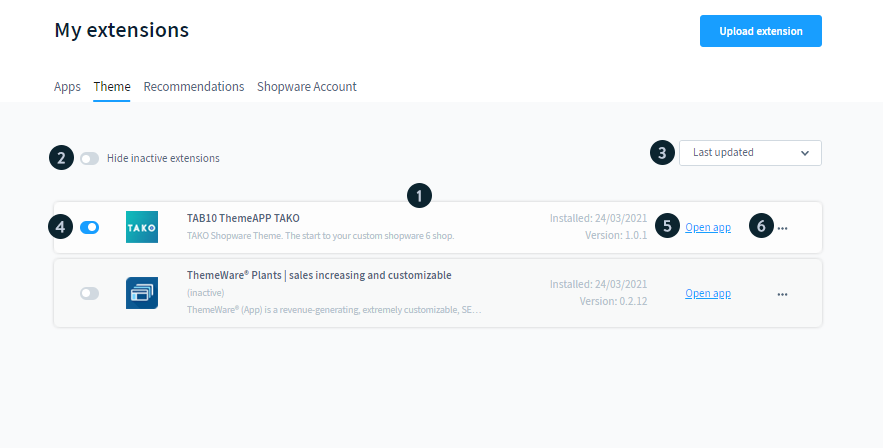
The Themes section gives you an overview of all the themes added to your store.

Temi

The section is divided into several columns

  • Theme overview (1): Here you can see an overview of all themes and the most important information on each theme.
  • Hide Inactive Extensions (2): Use this button to hide all currently not activated themes to get a better overview of active themes.
  • Sorting (3): Here you can specify the criterion by which the overview is to be sorted.
  • Active button (4): With this button, you can activate or deactivate the installed themes. Unlike uninstallation, deactivation has the advantage of not losing the settings made in the theme. Themes that are active here are not automatically assigned to a sales channel. The assignment takes place only in the sales channel.
  • Open app (5): this link takes you directly to the theme configuration page. “…”
  • “…” Key (6): Here you can call up the context menu for the respective theme. You can uninstall installed themes here. You can completely remove the themes already uninstalled by the administration here.

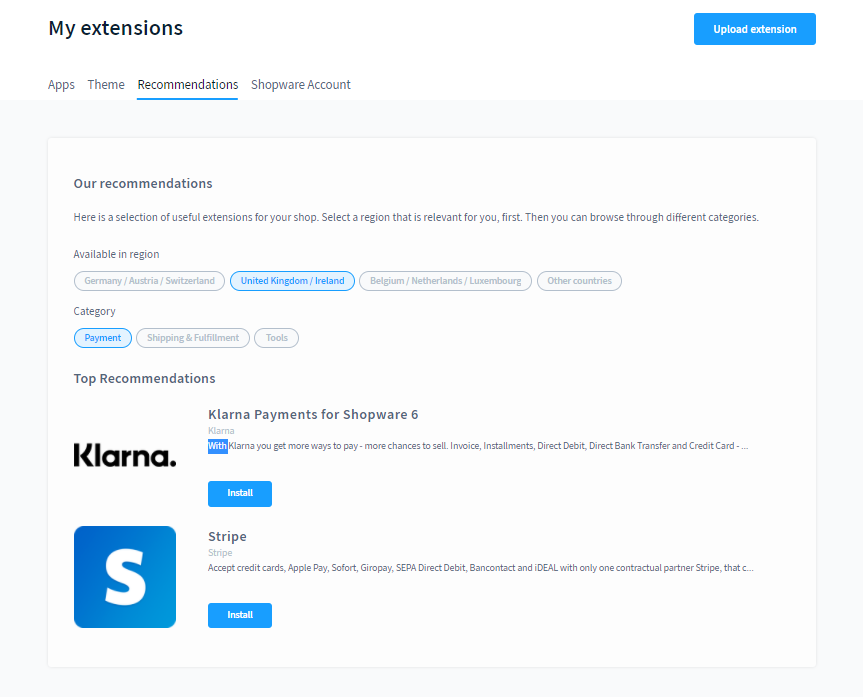
Recommendations

The Recommendations section gives you extension recommendations for certain areas of your store.

Install extension shopware
  • select the region and category for which you would like to receive advice. The categories then display these items.
  • Click the Install button to add the app directly to the app overview and install it.

Shopware Account

Here you can connect to your Shopware account to access your purchases.

Install extension shopware

Installing extensions

If the extension you’re looking for isn’t available in apps or themes yet, you’ll first need to add it to your store. There are two ways to achieve this:

  • Connect to your Shopware account: Head over to Account and log in. Once logged in, you’ll see all extensions already purchased for your store domain displayed in the apps and themes section. From there, you can simply install the desired extension.
  • Load extensions manually: Alternatively, you can take a more hands-on approach by loading the extensions yourself. To do this, download the necessary zip file directly from your Shopware account within the shop operator area.

Since the extension is now available in apps or themes, you can proceed with installing it. To achieve this, simply open the context menu by clicking on the “…” button. Once you’ve done that, select “Install” from the menu. Finally, you can activate the extension using the button in the Status column.

Configure extensions

For some active extensions, you’ll find a dedicated menu item within Settings > Extensions. This menu item allows you to open the extension configuration. To understand the specific functionalities and configuration options, the respective extension documentation provides detailed information for each extension.

That’s it, folks! Check out our blog.

Reading Time: 2 minutesSometimes, out of necessity or because you are no longer with your current provider, you need to do a domain transfer. But how exactly is it done?

Why should you switch providers?

Well this is the question you can decide to ask yourself, before continuing with the transfer. The causes of a change can be many. For example, you may not be happy with your current provider because:

  • services are no longer for you
  • the cost has increased
  • assistance is not optimal
  • the services are not performing

Which services do you want to transfer: dominoes, hosting or both?

The first thing to decide is what you want to transfer: a domain, a hosting or both?

For example, if you have a hosting service on one provider and the domain on another and you want to unify everything, you can transfer the domain to the hosting provider. How you do it?

It’s very simple: you just need to ask the domain provider for the authcode or authinfo. These are domain transfer codes associated with different TLDs, the first the authcode is related to .com domains, while the second, the authhinfo is linked to .it domains.

How to transfer a .it domain

The steps to make this change from one provider to another are the following for a domain with .it extension:

  • get the auth code we talked about before, by contacting the old provider
  • the domain must not have expired
  • have a copy of the site

With Bhoost, just communicate the above codes when ordering the domain transfer and the domain transfer procedure will start. The processing times of the process can vary between 1 and 2 days.

How to transfer a .com domain

The steps for a .com domain are similar to the ones we just talked about for .it, but with some minor changes.

In particular:

  • get the auth code we talked about before, by contacting the old provider
  • the domain must not have expired
  • the domain must be unlocked

Conclusion

Well now you know everything about how to make a domain transfer, but if you need to transfer your domain to bhoost and you need help in doing this procedure, do not hesitate to contact us by opening a ticket from your private area.

Reading Time: 7 minutes

Information technology has had a profound impact on modern business. People are now getting used to a new way of running a business: e-commerce. This new form of commerce has gained popularity in recent years thanks to its many advantages over brick-and-mortar stores. For this reason, many companies have decided to open their virtual stores. However, before creating a sales website, online merchants need to choose a suitable platform, which requires a lot of scrutiny.

We have already seen some useful comparisons between some platforms, but today we want to tell you about Sylius and Magento.

Sylius vs Magento: an overview

The first step before making further comparisons is to gain a thorough understanding of each platform. Therefore, here is some general information you need to know about Sylius vs Magento.

Sylius

Sylius is an Open Source E-Commerce platform based on Symfony, one of the best PHP frameworks. It is also powered by BDD (Behavior-Driven Development) via Behat, another PHP framework. Compared to other platforms, Sylius doesn’t have many merchants, only 2500+, but it was downloaded over 50k times in one month. Furthermore, many brands successfully manage their web shops with the help of Sylius.

Sylius 1.0 – the first version of this platform – was released on September 13, 2017. Sylius also released its latest version – Sylius 1.9 – on September 14, 2020. Also, besides the free version called Standard, Sylius only has the Plus one. And of course, you get what you pay for.

Magento

Magento is an open-source eCommerce platform written in PHP and built on the Zend Framework. It was first released on March 31, 2008, by Varien Inc. and then acquired by Adobe in May 2018. Many large companies around the world have chosen this popular platform, namely Nestlé, Nike, ASUS, Ford, Helly Hansen, HP and so on. So far, the number of Magento online stores around the world is around 750,000 and it will undoubtedly increase steadily.

Magento offers two different editions:

Magento Open Source (also called Magento Community Edition):
Magento Open Source provides essential functionality to power a simple website. Users don’t have to pay anything to download.

Magento Commerce (also called Magento Enterprise Edition):
Magento Commerce comes with advanced features, tools and architecture. Additionally, this release offers two different plans with two pricing options: on-premise and cloud.

Sylius vs Magento: the comparison

Having grasped several points on the two platforms, it’s time to make detailed comparisons between Sylius and Magento. They both have several similarities and differences.

1. Main features and functionality

The first thing when comparing Sylius vs Magento is the critical features and functionalities.

Sylius is a potential e-commerce solution offering open-source and global support, customer service, quick product search, market flexibility, etc. In addition, the REST API allows you to connect with third-party services (CRM, ERP, PIM, Mailing) and develop Web Progress apps. The paid version of Sylius (Sylius Plus ) offers users extra ready-to-use features for larger companies. A sum of money is worth several features such as Advanced Multi-Store Management, Loyalty System, Returns Management or Admins by Channel, Advanced User Permissions, etc.

Magento offers a variety of solid built-in features that are all helping to build an excellent e-commerce store. Inventory management, automated destination rules, flexible pricing tools, and so on are useful tools that make a difference. What’s more, the remarkable thing about this platform is that it also supports B2B features. As a result, B2B customers can experience great additional features, including but not limited to business accounts, quotes, shared catalogues, quick order and pay on account, quick restocking, etc.

2. SEO

SEO and marketing are two fundamental tools for the success of e-commerce. Therefore, it becomes fundamental, to make a comparative analysis also in this sense, between Magento and Sylius. It is clear that while Magento has all the SEO management features, Sylius does not. This therefore leads us to say that from this point of view, Magento has more potential.

Although Sylius Plus comes with some marketing features, such as email marketing, content management, review management, and CRM, it does not have SEO management. This is a considerable weakness. Therefore, you need to install additional extensions to optimize SEO on your site.

As a leading e-commerce solution, there is no doubt that Magento does a great job of offering countless ready-to-use SEO and marketing features that help its customers’ websites be more visible on Google and other search engines. Some ultra-modern SEO features are sitemap, search terms and synonyms, Google Tools 301 addresses, custom URLs, etc. As for marketing, there are several built-in features provided by Magento Commerce, including:

  • Promotion: gift card accounts, related product rules, etc.
  • Private sales: invitations and events
  • Communications: Email reminders, email and newsletter templates, etc.
  • User Content: Customer Reviews
  • Customer Engagement: dotdigital Chat, dotdigital Engagement Cloud, etc.

3. Prices

The Sylius Standard version does not require a subscription. However, a free edition is only aimed at a simple website with standard features and basic functions. You can consider purchasing Sylius Plus to own more facilities and optimize your store. Pricing is based on the gross volume model of the commodity. You need to contact them and ask for a quote to get an accurate price.

Magento Open Source is free, but Magento Enterprise Edition requires a payment based on the gross sales value of your business. While Magento Commerce’s on-premise plan costs $22,000 per year, you have to pay $40,000 per year for the cloud version. You could be spending a lot of money on Magento, but it’s worth it!

4. Scalability

For medium and large enterprises with large numbers of customers and looking to expand their business, scalability becomes a parameter to watch. So what’s the most reliable platform in this regard: Sylius vs Magento 2?

Scalability is certainly one of Sylius’ strengths. This platform can withstand an increase in productivity of up to 30%.

Compared to Sylius, Magento is far above scalability though. It can cover up to 50,000 visits per hour and, with an exemplary inventory management system, Magento can hold numerous products at the same time. Hence excellent scalability characteristics.

5. Speed ​​and performance

The speed of the websites is a crucial point for an online business to attract customers. Nobody wants to wait too long for a page to load, do they? For more than 3 seconds of delay in website loading time, they lose 40% of visitors. Plus, 70% of online customers never want to return to your page if they have to wait too long for it to load. The loading time of a website has a significant impact on the number of customers and revenue.

A website’s performance is affected by several factors, including image file size, coding applications, plug-ins, or hosting. As for speed, Sylius has more advantages than Magento. Sylius doesn’t require as many complex processes as Magento to set up. As a result, page loading is three times faster than Magento.

Magento always tries to update and customize its platforms with more features and functions, which means that the page takes a little longer to load.

However, some tools allow you to understand if your Magento site is slow or not. For info, the lectern is here.

6. Security

Cyber ​​attacks have grown at an alarming rate and have become a cause for concern for many companies. A group of hackers attacked more than 570 online stores in some 60 countries and leaked stolen information on 184,000 credit cards, earning $7 million. Furthermore, statistics indicate that 60% of online organizations fail after a few months of security attacks. Furthermore, hacking has an extremely negative impact on your trading operations. Consequently, choosing a platform with high security is an effective way to avoid this. Let’s take a look at the security comparisons between Sylius and Magento.

Sylius usually publishes security patches to avoid vulnerabilities. If not, companies can download security extensions.

patch-sicurezza-sylius

As for Magento, while Magento Commerce offers users predefined security features, Magento Open Source requires extensions, which can be downloaded easily. Alternatively, online merchants can wait for Magento security patches which are released frequently to prevent hacking risks.

Remember to always have an updated site and thus, be more secure.

7. Easy to use

Ease of use is another element that can influence your decision. The choice of platform by cyber traders depends on whether it fits their level of technical knowledge. Hence, Sylius vs. Magento 2: which is easier to use?

In these terms, Sylius is the winner, thanks to its coding quality. Even when you are not an experienced programmer, you can still design your website without putting in so much effort. Additionally, this platform helps developers access coding rules and standards. These practices are simple to follow, especially for those who have worked on other platforms previously, making Sylius easier to master.

On the other hand, Magento is a little more difficult for IT newbies to use. Being a more demanding engine, it needs many coding applications to be customized. For this reason, Magento brings excellent results only if the developers already have a rudimentary knowledge of the technology.

8. Support

Online merchants should add support to the list of factors considered. It’s not always easy to design and maintain an online store, so seeking help from people from the same community is very important.

Unlike Magento, Sylius has been relatively new and hasn’t gained a worldwide reputation. Therefore, it is quite difficult to find support from other Sylius users. Fortunately, Sylius provides detailed documents, video instructions, and discussion forums, which are useful for those who are learning to use this platform. We can assume Sylius has potential popularity in the future as its community is getting bigger and bigger. The reason is that Sylius is built on the Symfony framework and the Symfony community supports it extensively.

Magento is almost at the top of the popularity of the e-commerce platform. You are never alone because there are around 300,000 Magento users out there who could help you. You also have the option to discuss any issues you have with experienced developers, regardless of your location. Also, you can access the tutorials via the Magento Help Center or Magento Stack Exchange when using the Magento Open Source edition.

Then in Italy, we find Magentiamo, which since 2014 has been involved in creating guides, updates and training courses, specifically on Magento.

Conclusion

Sylius vs. Magento: who wins the challenge?

Simply put, it’s pretty hard to tell directly which one wins this battle as each has its advantages. But you still have to make a final decision, right? So, before choosing a solution to enhance your e-commerce store, you should carefully evaluate the situation of your business, including the scope of enlargement, financial, purposes, etc.

For example, if your business has goals geared to grow faster, with a large inventory, and has a large budget to outsource some coding processes, you should choose Magento. Meanwhile, Sylius will be a better choice if you want to claim that your online store is on a tight budget.

That’s it, folks! Check out our blog for more information.

🚀 Give your website a boost!
Try bhoost hosting for free for 30 days